Page 6 of 14

Re: [WIP] [Vehicle] Super Etendard

Posted: 2017-01-11 08:03
by Rhino
anantdeathhawk got any updates on this?

Also for your front landing gear, you currently have a little "spike" going down into the bottom rotating bit, this isn't necessary and just a waste of tris, and your better off just having those faces on the top arm deleted, and the bottom arm being wider so it will go inside it, especially for the "spring" suspension so when it compresses it goes over the main arm and doesn't clip through it as it will now :)

Re: [WIP] [Vehicle] Super Etendard

Posted: 2017-01-11 19:01
by anantdeathhawk
FLG lower part modified as specified by you, and the fuselage is more or less the same,as indicated in my last post that optimization modifier is not yielding results even when i did as you specified, i.e. after collapsing all the other modifiers.
Video:


Have issues with smoothing groups for the arrestor hook bay(slot).Is this smoothing acceptable?

Screens:
Image
Image

Thanks! :)

Re: [WIP] [Vehicle] Super Etendard

Posted: 2017-01-12 08:50
by Rhino
For your landing gear firstly either you shouldn't have the inside modelled, just a waste of tris, or you need to turn backfacecull on, on all your meshes by going to properties and checking this box on all of them to make them draw like they will ingame, which makes it far easier to spot errors etc:
Image

Also in Customise>Prefrences, Viewport tab you should have "Backface Cull on object creation checked to" to make sure all new objects have this option by default:
Image

And then ends need to be capped.


As for your arrestor hook slot, give the inside a different SG from the main fuselage since it shouldn't smooth with the rest of it.

Image

Also PM me the files and I'll give you some more feedback :)

Re: [WIP] [Vehicle] Super Etendard

Posted: 2017-01-12 16:03
by anantdeathhawk
Changed the settings as you suggested, thanks! :wink:

Sent you a PM for the files.

Re: [WIP] [Vehicle] Super Etendard

Posted: 2017-01-15 09:45
by Rhino
Right I'm not sure what is causing that problem with most edges not displaying after putting the optimize modifier on but one solution I've found is to add a "Turn to Poly" Modifier to the mesh, with it having a "Limit Polygon Size" checked and set to 3, which will then turn the mesh into the state it would be exported to the game in, but note I would recommend no collapsing this into the mesh as it is much harder to work with actual tris as you can't use the loop and ring selections, as well as other things so effectively.
Image

Now if you add the optimize modifier back on you can see that it works now as it should:
Image

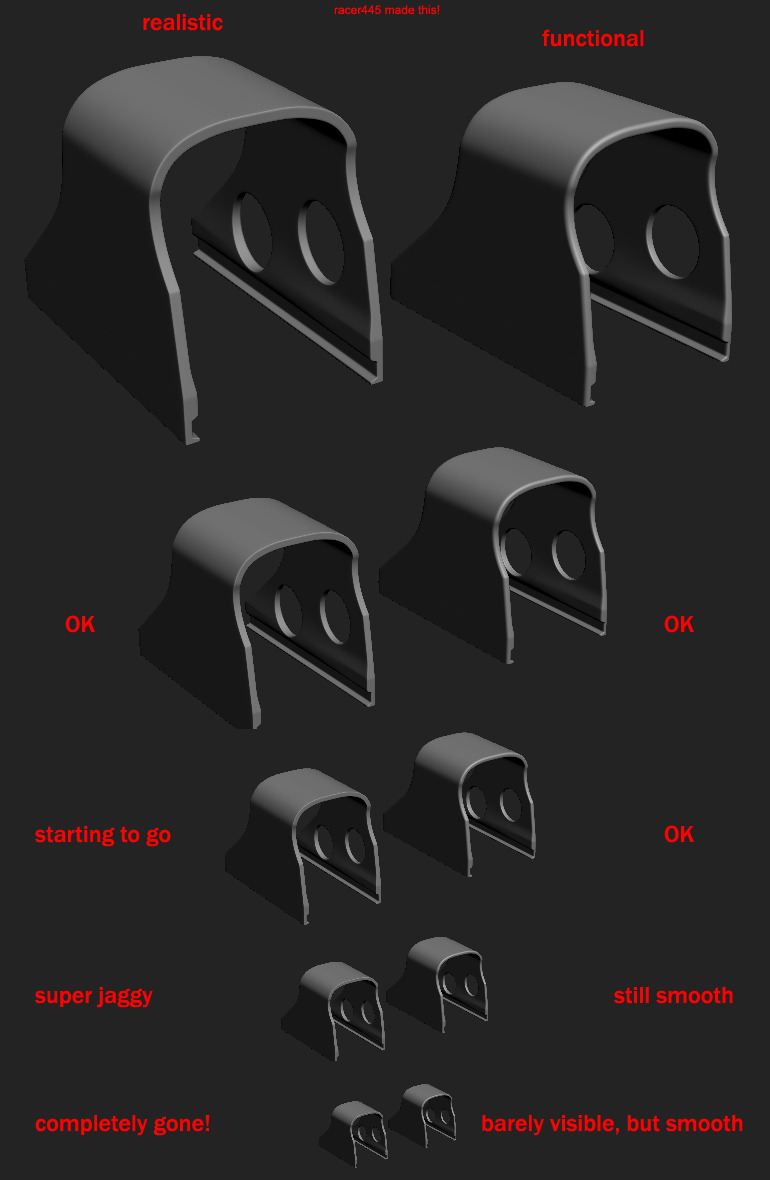
And even with only a threshold of 1, your saving 300tris, which is around 7% off the fuselage, but I would recommend a threshold of around 1.4 for this model after doing a few quick trial and errors tests to see which setting optimizes this model the most without deforming it, with also Preserve "Material Boundaries" if you want to keep the edges for the nose but tbh, not sure you need them really? But ye, with a threshold of 1.4 you save 380tris which is almost 10% off the fuselage alone, also taking into account that the optimize modifier tends to miss quite a few things it can optimize, even if it's optimized them on one side of the model it can miss it on the opposite side too so again as I've said before, only use this tool as a reference to see where you can make the optimizations manually yourself for best results, as it also tends to screw up some parts of the model, although main thing it screws up with certainty is the UVs which you don't have any yet so don't have to worry about that but can screw up some of the mesh too.
Image
Image

Anyways you can see from above, lots of places you can optimise the fuselage with keeping its same shape:

Off: http://i.imgur.com/YUECjIS.jpg
Image
Image

On: http://i.imgur.com/sBbNe0X.jpg
Image
Image

And things like even the Exocet rack etc have tris/verts they don't need, although keep in mind you will need to fix up your smoothing while optimizing too:
Image
Image

Image
Image

Image
Image

Also something the optimize modifier has missed but these verts are not needed, gotta made sure you check for this sort of thing all around you model.
Image

Also the hardpoints should NOT be welded onto the wings as firstly, there is no chance of them zfighting, since their bottom face is so far away, they don't waste any UV space which could be used by other things since the hole they make in the wings UV is too small to be used by anything else, they screw up the wings smoothing, waste tris and it just makes making the LODs etc much harder, with them also needing to be totally removed in the later LODs which would also expose the UV hole under them which would just be its shadow on the later LOD which is fine. As you can see on the J-10 for example, the hardpoints are just floating mesh on the wing:
Image
Image

Which are then totally removed in its later LODs, just leaving the shadow under them:
Image


The optimize modifier can't pick up on this but your nose also needs quite a bit of optimization since it has the same number of edges leading down to the tip.
Image

Firstly I would recommend backing up your current nose as you might want its shape as not only a refrence for its orignal size etc, but also a good base to make the high poly model on, since I would reocmmend you control the smoothing with baking normals from a HP nose which will then smooth out any issues caused by optimization, like on the blowpipe missile here where it has nothing really in the way of edges to help control its smoothing, it then has a really shadowy tip:
Image
Image

But baking its normals from this HP model:
Image
Image

The smoothing issues are then corrected by its normal :D
Image
Image


Then going back to your nose, first of all I would recommend collapse down these edge loops as you don't really need them:
Image
Image

Image
Image

Then can collapse down these edges:
Image
Image

Image
Image


And looking at your loops again looks like you can also collapse down this one here:
Image
Image

Image
Image

Can't really do much more to the nose for LOD0 but for the later LODs there is more you can do but don't worry about that for now :)
But ye, nose looks pretty much the same, might want some parts scaling up a little to match the old size too, but other than that and the smoothing is a bit worse, which can be corrected and look much smoother than it did before with a HP normal bake, its al lgood and much fewer tris :D


Lasly for now I'm pretty sure unless you've got a source to say otherwise, that the droptank should be totally round, right now its kinda fat :p
Image

The thins also have a lot of unessary verts etc:
Image


Anyways have a go with that method of adding the turn to poly with max poly size of 3 then adding the optimize modifier on to see where you can optimize your mesh and also look around for other parts that you can modify and improve that I haven't mentioned above and the optimize modifier doesn't pick out either and then post here with your updates :D

Keep up the good work and hopefully we can have this thing attacking my Frigate soon! ;)

Re: [WIP] [Vehicle] Super Etendard

Posted: 2017-01-19 12:00
by anantdeathhawk
Update:
Hello,i really appreciate that feedback and have to say that optimization was a most challeging think for me yet.Seeing the optimization modifier work and then switching back to editable poly and removing tris was good, but when again i used the optimizer, it would show yet more optimizations.
Completed all the things as you said,i.e.
1.Detached the hardpoints.
2.Made the drop tank rounder(to me in the reference pictures on the internet,appeared that drop tanks were a little bit fat on the sides and therefore i had made it that way.
3.Saved a extra nose for high poly bake and made the nose on the fuselage low in tris.
removed the tris here and there around the cockpit and fuselage(including the small quads near the harpoints.

Tris:3456,including the optimized fuselage, the hardpoints and the nose.
Screens:
Image
Image
Image
Image
Image
Image
Image
Image
Image
Image
Image
Image
Image

Thanks!

Re: [WIP] [Vehicle] Super Etendard

Posted: 2017-01-19 12:52
by Rhino
Looks good :)

The refs of the drop tank that I can find head on, look round to me? Can you find the one that shows it being fat?
Image
Image
Image

Also how come you still have the holes/polys for where the hardpoints go under your wings? Should remove them:
Image


Have you finished all your optimization then and if so, what is your planned next step now? :)

Re: [WIP] [Vehicle] Super Etendard

Posted: 2017-01-19 17:00
by anantdeathhawk
You mean,i should fill in those holes and remove the quads where the hardpoints attach right?
Ohh, i can't find such good references like you do :o , ok so round it is and yeah i'll check for opimization one more time, although i think its pretty much it.

Have you finished all your optimization then and if so, what is your planned next step now?
Whatever you say, you're the dev. 8)

Re: [WIP] [Vehicle] Super Etendard

Posted: 2017-01-19 17:06
by Rhino
anantdeathhawk wrote:You mean,i should fill in those holes and remove the quads where the hardpoints attach right?
Ohh, i can't find such good references like you do :o , ok so round it is and yeah i'll check for opimization one more time, although i think its pretty much it.

Whatever you say, you're the dev. 8)
Remove the verts supporting the hardpoint holes yes :)

As for the refs, I just quickly did a Google Image Search for "Super Etendard" and under the Tools tab set the image size to large so you only get decent rez pics showing up :)
https://www.google.co.uk/search?q=Super ... &tbs=isz:l

As for the next step, I meant what do you know you still need to do before you move onto UVing.
BTW one thing I forgot to mention above is that iirc, the little box bits supporting the air intake still have their end faces on the fuselage side, possibly the other. Can get a pic if you need, just remembered after looking at the ref above :p

Re: [WIP] [Vehicle] Super Etendard

Posted: 2017-01-19 17:15
by anantdeathhawk
Ok, will remove those and thanks for letting me know the secret to good references :) .
What about front wheel high poly?

They are attached from the right side and not from the left side just going littlebit inside the cockpit, and that left side has faces.
Image

Also should i make slots for the guns?

Re: [WIP] [Vehicle] Super Etendard

Posted: 2017-01-19 17:44
by Rhino
Ye delete the left face and technically they don't need to be welded on the right side since won't prevent any z-fighting and won't save any room on the UVs and just wastes polys :p

As for the slots for the guns, ye worth making them. Ideally you would also want to support them with a high poly mesh bake too as otherwise you will need to spend quite a few tris to control the smoothing etc where you can cut down a lot of the tris if you get the normals to do most of the work. You could even get normals and an AO to do all the work for them but it wouldn't look very good at some angles so best to do them with polys.
Also note that the guns are removed for when the Exocet is mounted on to make room for Avionics to control the missile but best to model the guns too and make them detachable (ie, a basic cylinder inside that isn't welded onto the main mesh, shouldn't need much in the way of UV space either) in case we need them at all ;)

As for the front wheel, ye just copy your HP of your back wheel, take off the breaks etc and make it smaller. Although you may be able to use the same texture/UV as your back wheel, just not using the side with the break on and if so, that would be best.

Re: [WIP] [Vehicle] Super Etendard

Posted: 2017-01-19 23:31
by B4rr3l
Nice Job!

Re: [WIP] [Vehicle] Super Etendard

Posted: 2017-01-20 15:09
by anantdeathhawk
update:
Done
1. HP supporting gun area and guns.
2. LP gun area and guns.
3. faces b/w intakes and the cockpit removed.
4.HP front wheel,looks the same from both sides i.e. right side and left side of the aircraft.

* Guns are a separate mesh and LP guns have 7 sides.

Screens:
Image
Image
Image
Image

Thanks.
---------------------------------------
To B4rr3l: Thanks.

Re: [WIP] [Vehicle] Super Etendard

Posted: 2017-01-21 13:38
by Rhino
Need to work on your gun slots HP model, you can't just take the LP model and subdivide it, needs much more work than that to ensure its the right shape and with no errors etc :p

Also your cylinders should be either 6 sides, 12 sides or 8 sides, as then you can easily collapse them down for the lods, with 12 tris going to 6 sides, 6 to 3, and 8 isn't the perfect number since its minimum is 4 sides, but still better than 7 which you can't collapse down without significant rework and your better off just making a new cylinder and UVing it for the LODs :p

As a general rule, you should be looking at having sides that divide into 3 or 4 at the most.

Re: [WIP] [Vehicle] Super Etendard

Posted: 2017-01-27 14:14
by anantdeathhawk
Update:

Changed the sides of the low poly guns to 12. and did a little work on the HP gun area.

Screens:
Image
Image

Thanks.

Question:
Should the next thing be the UV? If yes how should i go about it, should i use the multi unwrap script to unwrap all at once? Which parts should be on which sheet?

Re: [WIP] [Vehicle] Super Etendard

Posted: 2017-01-28 13:07
by Rhino
Nice work but think your edges on your HP model are a little small, would make them bigger so the normal has more chance to work, as per this: http://wiki.polycount.com/w/images/8/85 ... ckness.jpg

Might also be worth doing a HP model for the cannon barrel too to get some detail on it :)

As for your next step, really ensuring the model is 100% final is the main thing. Do any more optimisations and tweaks you need to do then post pictures of it here with lots of angles and in lots of view modes (a few renders with direct lighting and shadows would be good too, no skylight or at least only a very soft one) and send me the file to look over too before you get onto UVing.

As for how to go about UVing, the Multi-Unwrap script for Max9 is a little tricky to use so I would recommend that you avoid using it as much as you can. I would personally unwrap each object with normalisation off (so they are all the same scale) then once that is done you can then use the Multi-Unwrap script to pack all your work together but make sure you save backups before and while you doing this, and each time you save make sure you apply your multi-unwrap and don't save with it still active, even thou there is a way to apply new UVs done with it to an old backup with separate objects, it doesn't always work and certainly wont work if the mesh has changed, but then you can pack all the parts like in this little video I did here of me packing my Frigates UVs after I had UVed every little component in non-normalised mode separately, which meant then all I had to do was position each one and not worry about scaling etc :)

Re: [WIP] [Vehicle] Super Etendard

Posted: 2017-03-02 04:30
by anantdeathhawk
Sorry for the absence,i had exams to give.

About the guns' high poly barrel.The gun barrel is pretty much smooth and has no details on it.
Image
Image

And edges being small, were you talking about this?
Image

Thanks! :-)

Re: [WIP] [Vehicle] Super Etendard

Posted: 2017-03-02 06:42
by Rhino
cool and yes.

Re: [WIP] [Vehicle] Super Etendard

Posted: 2017-03-02 23:13
by salutcestbooby
With this cool new asset could we see in the future a french 4k map with super etendard and/or mirage jets ?

Re: [WIP] [Vehicle] Super Etendard

Posted: 2017-03-10 17:13
by anantdeathhawk
Update:

Screens:
Image
Image
Image
Image
Image
Image
Image
Image
Image
Image
Image
Image
Image
Image

Renders:
Image
Image
Image
Image
Image
Image
Image
Image

Thanks!

To salutcestbooby:I don't know, may they will in the future.