<SIMPLE TUT: TEXTURE ATLASES FOR BEGINNERS>
OK now I'm no expert on this but I probably know enough to get what you need done. Going out on a limb here but I think you have a small enough job just avoid the texture tool, but maybe someone else can step in and explain how you use it, who knows.
For all examples I am going to reference the way PR does it as it is the PR Forums ; )
The first thing you would want to do is create an additional Texture atlas. Say you have the atlas's
MemeAtlas_030.dds
MemeAtlas_031.dds
MemeAtlas_032.dds
already created, start making a texture in photoshop called MemeAtlas_033.dds. If you have none already just start out with MemeAtlas_30.dds. From what I understand you've already done this so just make sure all the images are compressed together but not so much so that there will be overlap. Once you are done save the image as above (MemeAtlas_03<Whatever #you chose to use>.dds)and extract to the folder mod/menu/menu_client.zip\Atlas
Now the tough part

.
Navigate to the folder:
mod/menu/menu_server.zip\Atlas
You should have a file called AtlasList.con with this code in it:
Code: Select all
hudManager.addTextureAtlas "PR_MemeAtlas.tai"
hudManager.addTextureAtlas "MemeAtlas.tai"
note the PR_MemeAtlas.tai might be named something different depending on what mod you're from.
If the file or those lines aren't there write them yourself
Next Open PR_MemeAtlas.tac (or whatever its called for you as long as it is a .tac file) in the same directory:
If for these icons you are replacing older files ensure that all your files are listed in here using search (control + f) and if they
are in the file you are fine with this file. If not then add the appropriate lines at the bottom of the list with this basic template:
<directory of the texture in the menu_client folder with "menu" as the root> border
eg:
Code: Select all
Menu\HUD\Texture\Ingame\Vehicles\Icons\Hud\VehicleIcons\t62.tga border
No idea why this is actually necessary but just do it lol
Once all your files are included in here the next thing you worry about is to make sure none of your files are in the exclude list which is
MemeAtlasExclude.lst (which is in the same directory we have been in)
if none are in this list, you are fine; if they are in the list remove them.
Finally the tough part which is editing the .tai file
Open up PR_MemeAtlas.tai in the same directory or whatever your .tai file is listed as.
Here is the very basic explanation of how the file works from the file itself:
----------------------------------------------------------------------------------------
menu\Atlas\PR_MemeAtlas.tai
<filename> <atlas filename>, <atlas idx>, <woffset>, <hoffset>, <width>, <height>
Texture <filename> can be found in texture atlas <atlas filename>, i.e.,
<group><idx>.dds with texture coordinates boundary given by:
A = ( <woffset>, <hoffset> )
B = ( <woffset> + <width>, <hoffset> + <height> )
where coordinates (0,0) and (1,1) of the original texture map correspond to coordinates A and B, respectively, in the texture atlas.
----------------------------------------------------------------------------------------
So basically in English what you are going to be doing is adding a line for each new image you want ingame. I will make the following line as an example of one of the textures from the actual HUD/Selection folder which is almost identical to what you need to do:
The final product will look like this:
Code: Select all
Menu/HUD/Texture/Ingame/Weapons/Icons/Hud/Selection/Ataka_missile.tga Menu\Atlas\MemeAtlas_032.dds, 2, 0.0761719, 0.766602, 0.0732422, 0.0219727
So your code is going to look like this:
Menu/HUD/Texture/Ingame/Weapons/Icons/Hud/Selection_alt/my_weapon.tga Menu\Atlas\MemeAtlas_033.dds, 3, <[starting width pixel of icon]/[total width of map]>, <[starting height pixel of icon]/[total height of map]>, <[width of icon]/[total width of map]>, <[height of icon]/[total height of map]>
Now your going to have to find the 4 numbers at the end manually. The first thing you want to do is record the height and width of your image using the image/image size in photoshop. For this example the image is 2048 width and height. Now you need to record the starting and ending pixels of both the height and width of the image. To do this go to the ruler tool. When you click on a given pixel it will list the pixels height and width. By clicking the upper left corner of the icon you will get the starting height and width and then by dragging the other end to the bottom right corner you will get the height and width. Note: round to the pixel here and be sure you have the right pixels. Use the standard bf2 textures as templates.
Here is the example's pixels being measured in photoshop:
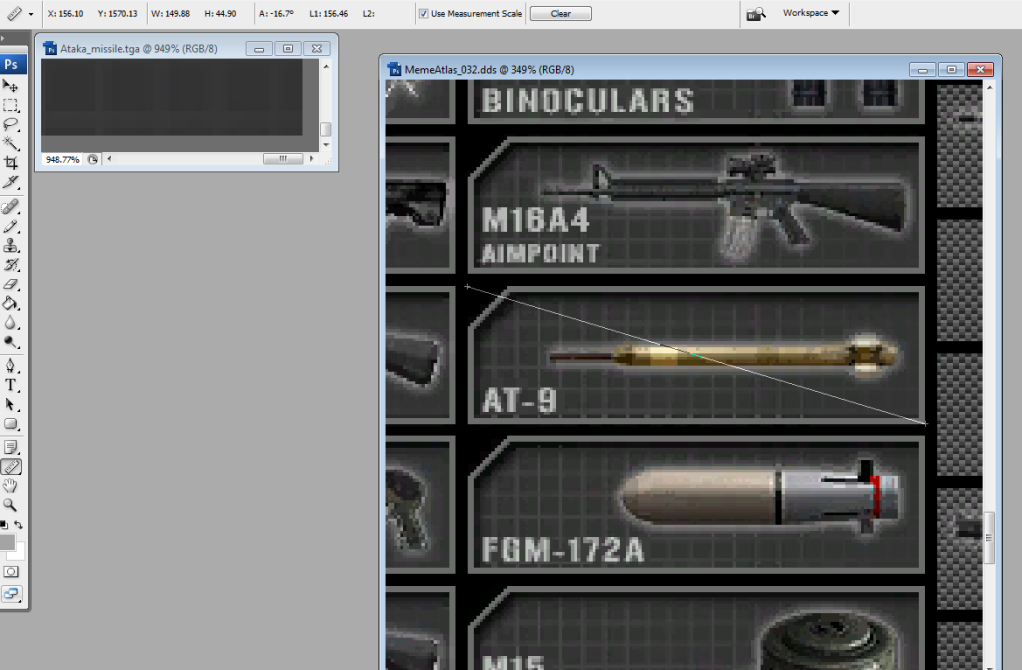
For the example the values (you can see them in the upper left corner of the example image) are:
Starting Width: 156
Starting Height: 1570
Width of icon: 150
Height of icon: 45
Next by doing some math you can find the four numbers in the file which are simply the numbers above divided by the total width and height rounded to 6-7 decimals (make sure you round the last decimal right

).
Starting Width: 156/2048 = .0761719
Starting Height: 1570/2048 = .766602
Width of icon: 150/2048 = .0732422
Height of icon: 45/2048 = .0219727
Finally take those 4 numbers and list them in order at the end of the line which once again looks like this:
Code: Select all
Menu/HUD/Texture/Ingame/Weapons/Icons/Hud/Selection/Ataka_missile.tga Menu\Atlas\MemeAtlas_032.dds, 2, 0.0761719, 0.766602, 0.0732422, 0.0219727
Also note here that if the icons in question are already listed in the .tai file you need to replace the old values not create new ones but if they aren't just add these at the bottom of the list.
Hope that helps
