Guide on making Soldiers more Combat Effective (Includes Diagrams)
Posted: 2011-05-25 06:09
Fixed and expanded Observing your Field of Vision, added Slicing your Pie: May 29-2011
Updated: May 26- 2011
I have now played PR for about 2 months now. I went from Counter-strike to Call of Duty 4 to a Half-Life 2 mod called Insurgency, and now I'm a Project Reality player.
So I adapted from the method of instantly shooting targets that appear in your sights, to the required PR adapt to deviation settling fire method.
I get about a average 4/1 kill ratio (Not including enemy revives)
Here are my tips for new players to improve their combat effectiveness:
Individual Infantry Tips:
Always check the map and know your position, position of friendlies and possible enemies,
I binded my map key to F and mouse 3 to map zoom, in and out. This allows me to quickly locate possible enemy threats, know which routes to flank the enemy, where to set up IEDs, C4, Claymores for the enemy to walk in, or a classic ambush.
As I re-configured my map key, I re-configured my equipment selection keys, because drawing grenades and weapons takes a few seconds, you really don't want to waste a extra couple of seconds scrolling your mouse wheel to select what you need. Many times a enemy will turn around the corner and catch you off guard while your busy trying to grab something from your list.
Patience during aiming is required
In real life, it takes time to adjust the front post of your sights to the rear post. PR copies this by adding deviation. At certain ranges, you have to wait 2-4 seconds with 4x scopes before firing a accurate first shot. Red Dot and iron sights are a bit faster to sight in, but you don't have the advantage of zoom the 4x scopes provide.
Observing your Field of Vision
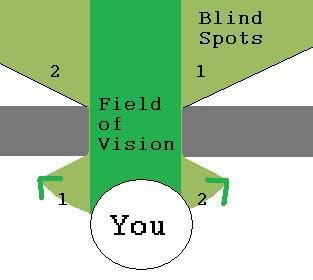
Area 1 is where you can observe Area 1's blind spot.
Area 2 is where you can observe Area 2's blind spot.
There are blind spots in every cover. In order to observe the maximum field of vision. You should shift along the lower upside down arch to observe the blind spots. This is also known as slicing your pie.
Slicing your Pie

It is not necessary to always be close to the cover when engaging targets around the corner. This diagram shows the correct position on where to engage targets in the pie.

Another example to show how to engage multiple enemies in the pie.
Proper Firing stance and position.
Once you have located a enemy after peeking around your cover, now is to position yourself carefully in a firing stance that doesn't reveal yourself in your blind spots of your fire sector.
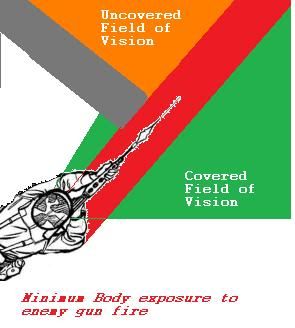
When firing around cover, step a few steps back so your rifle barrel will not stick out and expose yourself to uncovered field of vision. If a enemy is observing the uncovered field of vision, and sees the barrel sticking out, he will know your location and that puts you in danger. This also protects you from less enemy fire because less of your body is visible to the enemy.
Remember if you can see the enemy, the enemy can see you!
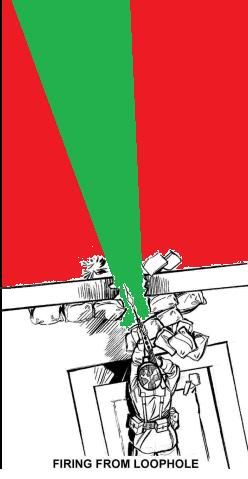
Just another example of a secure firing position that provides the maximum safety from uncovered field of visions.
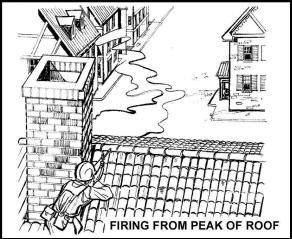
Always stand and leave only your head, shoulders, rifle and arms exposed. This exposes 17.5 percent of your silhouette and allows you to duck behind cover if needed. The chimmy distorts the shape of your silhouette making it harder for your enemies to spot you.
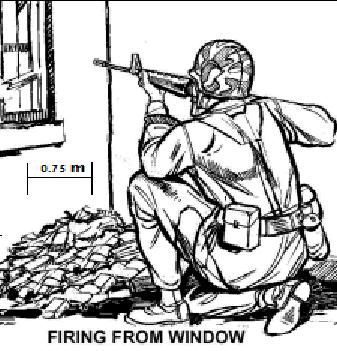
Always stay 0.75 meters away from the window when firing, if you stay too close to the window when firing, you might expose a arm, weapon barrel, or shoulder to the enemy in one of your blind spots.
Squad Tactics:
While PR offers 6 man squads, I am only going to use 4 man fire-teams to explain my squad tactics.
Each fire-team will consist of a Team Leader (TL), Rifleman (R), Grenadier (G) and an Automatic Rifleman (AR).
Wall Corner Engagements
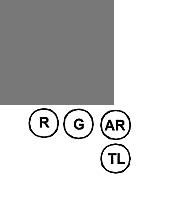
AR is in front of the TL crouching. This allows the maximum amount of rounds to go down range towards enemy target(s) while keeping the most protection from wall cover. The TL is free to observe and provide fire support while standing behind the AR. If the enemy is dug in behind cover like a balcony. The TL can swap positions with the G and deliver a M203 HE into the enemies position.
Suppression, Covering, and moving as a team
The four F's
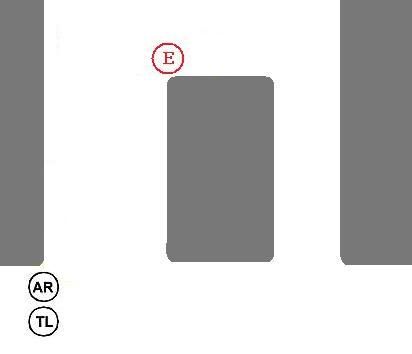
Find the enemy!
Observe and locate the enemy, once you have situational and environmental awareness, you can proceed to the next step.
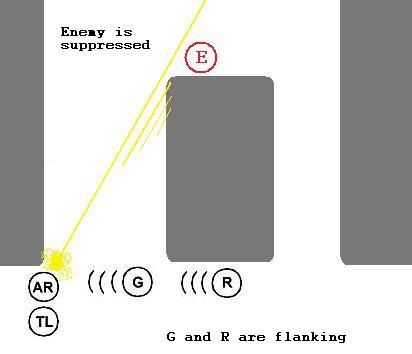
Fix the enemy!
and
Flank the enemy!
Once you suppress the enemy, he is fixed and cannot move his position, depending on conditions, the enemy may retreat or if he cannot, he is forced to be fixed. Regardless, if your fire-team moves fast enough, they will eliminate the target before he can react.
While the AR is designed to suppress the enemy, any soldier can suppress targets, however they will not have the volume of fire the AR provides.
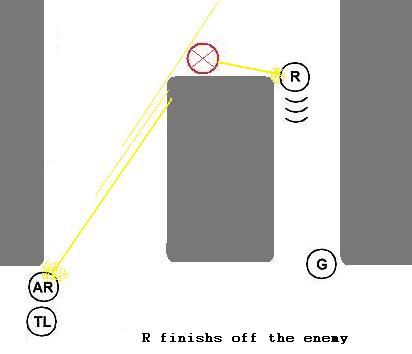
Finish the enemy!
Once the enemy is suppressed, all that is left is to finish off the threat.
Cover the last man!
The 2nd last man to move across to cover should always cover the last man crossing the open field. It takes a effort of one man to cover the last man who covered you earlier. It takes a entire fire-team to rescue a downed squad-mate. This works for suppression as well.
Smoking and Moving from cover to cover
Sometimes there may be too many targets for you to effectively suppress targets, smoke grenades provide a obstruction to the enemy field of vision, and allows your fire-team to move out of the kill zone.
Area 1 is correct position to throw the smoke grenade. It obstructs the maximum field of enemy vision.
Area 2 is incorrect and puts your fire-team in danger of enemy advancement. Plus it requires more than one smoke grenade.
To be continued... Feel free to comment, share advice, feed-back, ask questions and so on. Happy gaming! =)
Updated: May 26- 2011
I have now played PR for about 2 months now. I went from Counter-strike to Call of Duty 4 to a Half-Life 2 mod called Insurgency, and now I'm a Project Reality player.
So I adapted from the method of instantly shooting targets that appear in your sights, to the required PR adapt to deviation settling fire method.
I get about a average 4/1 kill ratio (Not including enemy revives)
Here are my tips for new players to improve their combat effectiveness:
Individual Infantry Tips:
Always check the map and know your position, position of friendlies and possible enemies,
I binded my map key to F and mouse 3 to map zoom, in and out. This allows me to quickly locate possible enemy threats, know which routes to flank the enemy, where to set up IEDs, C4, Claymores for the enemy to walk in, or a classic ambush.
- This also will save your teammates from your friendly fire.
- This will also allow you to quickly notify your squad-mates where the enemy is gonna be approaching them. Use only the general compass directions ie: W, NW, N, NE, E, SE, S, SW, it allows your squad-mates to quickly turn to face the incoming threat, telling the number of degrees works, but isn't as effective in time.
As I re-configured my map key, I re-configured my equipment selection keys, because drawing grenades and weapons takes a few seconds, you really don't want to waste a extra couple of seconds scrolling your mouse wheel to select what you need. Many times a enemy will turn around the corner and catch you off guard while your busy trying to grab something from your list.
Patience during aiming is required
In real life, it takes time to adjust the front post of your sights to the rear post. PR copies this by adding deviation. At certain ranges, you have to wait 2-4 seconds with 4x scopes before firing a accurate first shot. Red Dot and iron sights are a bit faster to sight in, but you don't have the advantage of zoom the 4x scopes provide.
- Always aim for the head if the target is not moving.
- When the target is moving horizontal across the field, you have to aim a few inches in front of the direction they are moving to compensate for bullet travel.
- One accurate bullet is more deadly than 5 missed shots of spray.
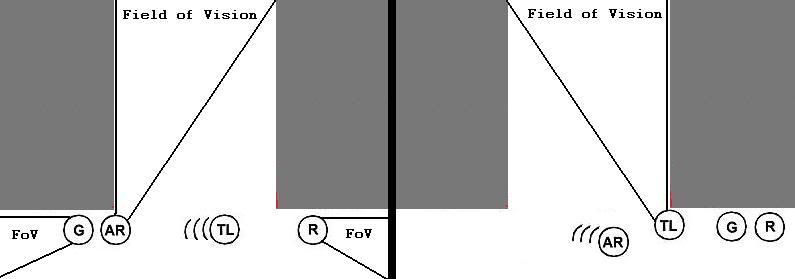
Observing your Field of Vision
Area 1 is where you can observe Area 1's blind spot.
Area 2 is where you can observe Area 2's blind spot.
There are blind spots in every cover. In order to observe the maximum field of vision. You should shift along the lower upside down arch to observe the blind spots. This is also known as slicing your pie.
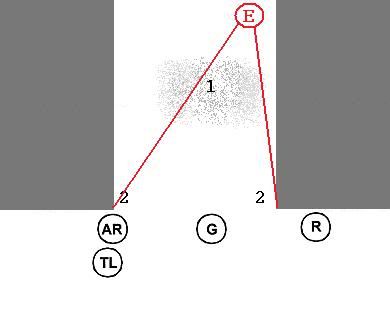
Slicing your Pie
It is not necessary to always be close to the cover when engaging targets around the corner. This diagram shows the correct position on where to engage targets in the pie.
Another example to show how to engage multiple enemies in the pie.
Proper Firing stance and position.
Once you have located a enemy after peeking around your cover, now is to position yourself carefully in a firing stance that doesn't reveal yourself in your blind spots of your fire sector.
When firing around cover, step a few steps back so your rifle barrel will not stick out and expose yourself to uncovered field of vision. If a enemy is observing the uncovered field of vision, and sees the barrel sticking out, he will know your location and that puts you in danger. This also protects you from less enemy fire because less of your body is visible to the enemy.
Remember if you can see the enemy, the enemy can see you!
Just another example of a secure firing position that provides the maximum safety from uncovered field of visions.
Always stand and leave only your head, shoulders, rifle and arms exposed. This exposes 17.5 percent of your silhouette and allows you to duck behind cover if needed. The chimmy distorts the shape of your silhouette making it harder for your enemies to spot you.
Always stay 0.75 meters away from the window when firing, if you stay too close to the window when firing, you might expose a arm, weapon barrel, or shoulder to the enemy in one of your blind spots.
Squad Tactics:
While PR offers 6 man squads, I am only going to use 4 man fire-teams to explain my squad tactics.
Each fire-team will consist of a Team Leader (TL), Rifleman (R), Grenadier (G) and an Automatic Rifleman (AR).
Wall Corner Engagements
AR is in front of the TL crouching. This allows the maximum amount of rounds to go down range towards enemy target(s) while keeping the most protection from wall cover. The TL is free to observe and provide fire support while standing behind the AR. If the enemy is dug in behind cover like a balcony. The TL can swap positions with the G and deliver a M203 HE into the enemies position.
Suppression, Covering, and moving as a team
The four F's
Find the enemy!
Observe and locate the enemy, once you have situational and environmental awareness, you can proceed to the next step.
Fix the enemy!
and
Flank the enemy!
Once you suppress the enemy, he is fixed and cannot move his position, depending on conditions, the enemy may retreat or if he cannot, he is forced to be fixed. Regardless, if your fire-team moves fast enough, they will eliminate the target before he can react.
While the AR is designed to suppress the enemy, any soldier can suppress targets, however they will not have the volume of fire the AR provides.
Finish the enemy!
Once the enemy is suppressed, all that is left is to finish off the threat.
Cover the last man!
The 2nd last man to move across to cover should always cover the last man crossing the open field. It takes a effort of one man to cover the last man who covered you earlier. It takes a entire fire-team to rescue a downed squad-mate. This works for suppression as well.
Smoking and Moving from cover to cover
Sometimes there may be too many targets for you to effectively suppress targets, smoke grenades provide a obstruction to the enemy field of vision, and allows your fire-team to move out of the kill zone.
Area 1 is correct position to throw the smoke grenade. It obstructs the maximum field of enemy vision.
Area 2 is incorrect and puts your fire-team in danger of enemy advancement. Plus it requires more than one smoke grenade.
To be continued... Feel free to comment, share advice, feed-back, ask questions and so on. Happy gaming! =)