
The area marked in red seems to have an unnecessary amount of edges.


purdy sweet dude
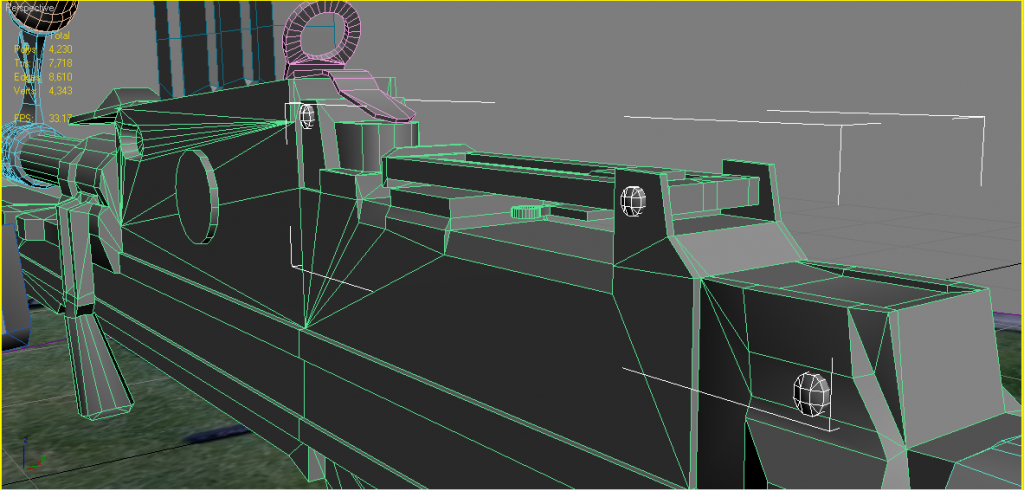


So going to select the back face, then using the Face Tessellate I will form a central vertex, that then you just need to move back inside the barrel a bit'[R-DEV wrote:Rhino;1841523']Also always for barrels you should always have a cone rather than a cylinder with a back face as for starters, its far less tris but not only that, it also gives a much better "bottomless" effect when textured with a shadow in the middle and takes up far less UV space and easier on the LODs
But saying that for a 1p handheld weapon like this your not going to ever see down its barrel, only in 3p but still best to model it just encase it dose come up in the animations and also helps with future proofing etc


^ As for coning the inside of the flash suppressor, oops, I see what you were talking about now lucky... My bad! Yes this needed to be done. I thought you were talking about the other inner geometry of the flash suppressor... That didn't look right. But this ngon poly that Rhino pointed out, that's what you were talking about? Geeze I feel like a heel now.lucky.BOY wrote:Collapse the face inside your barrel, leave only a cone there, not a cyllider like you have now.
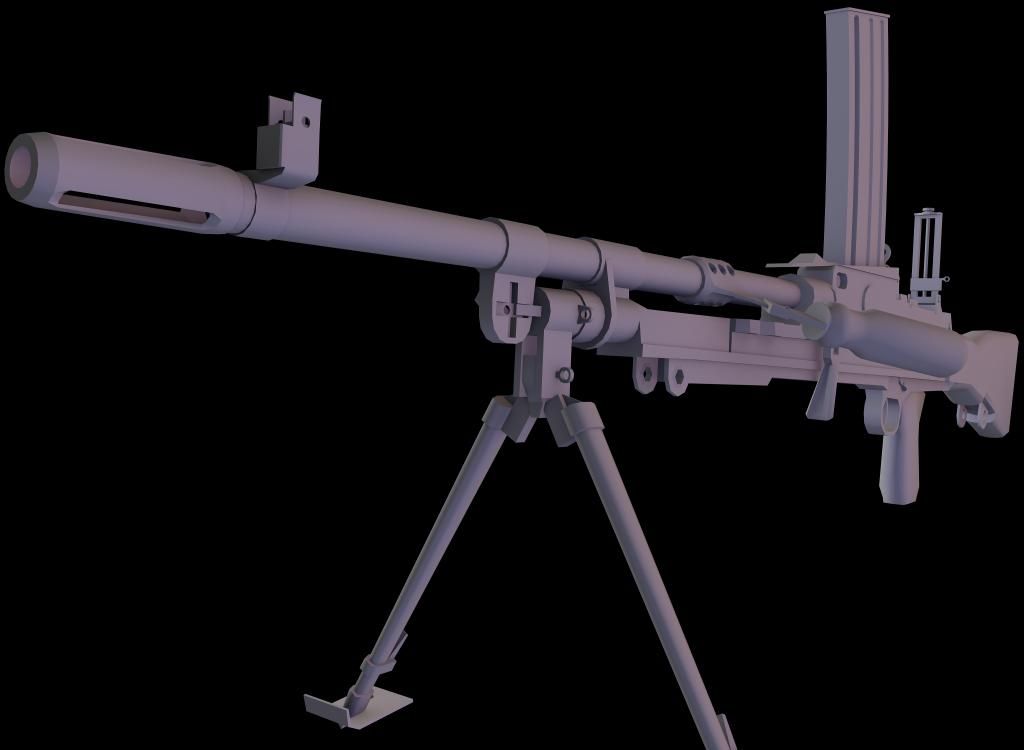
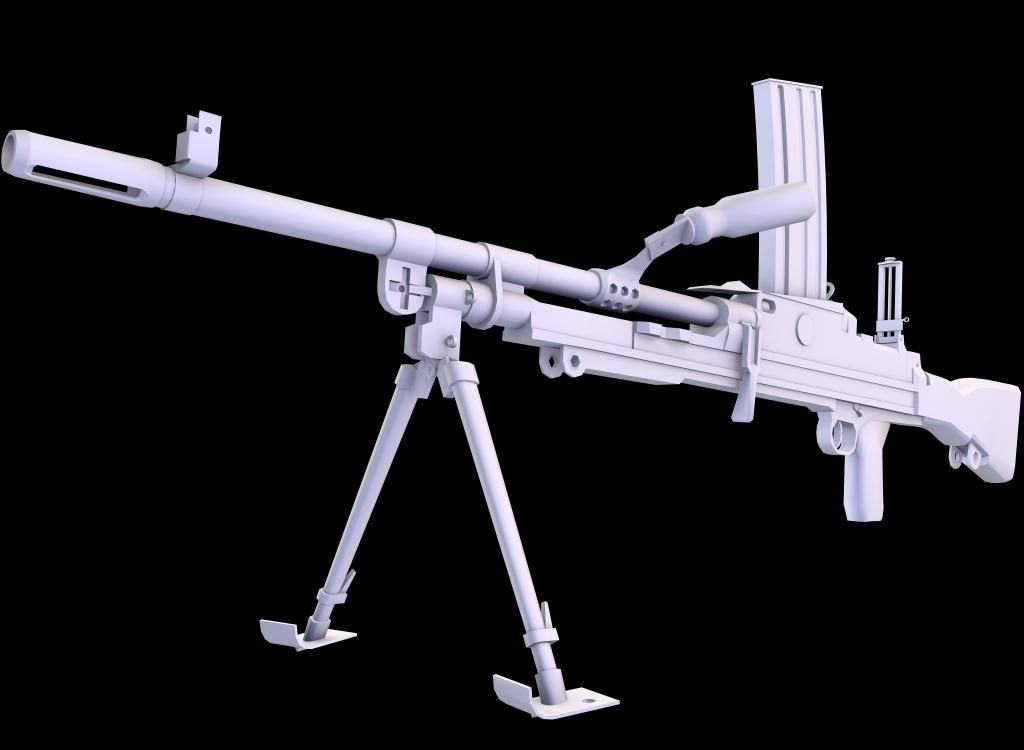
[/quote]^Which brings me to one thing I would ask... Should I model the shell ejection port? It's on the underside of the weapon, and the only time it would ever be seen is when someone is standing directly below whoever is firing the weapon. 1p would never see it unless he was holding the weapon upside down, which is why I hadn't modeled it yet.'[R-DEV wrote:Adriaan;1841165']The spent casings come out of the bottom of the gun, the ejection port is straight down from the magwell I think.
Can see the shells coming out of the bottom here (granted it's a Mk2, but I think it's the same still?):
Shooting the British Bren MkII light machine gun - YouTube
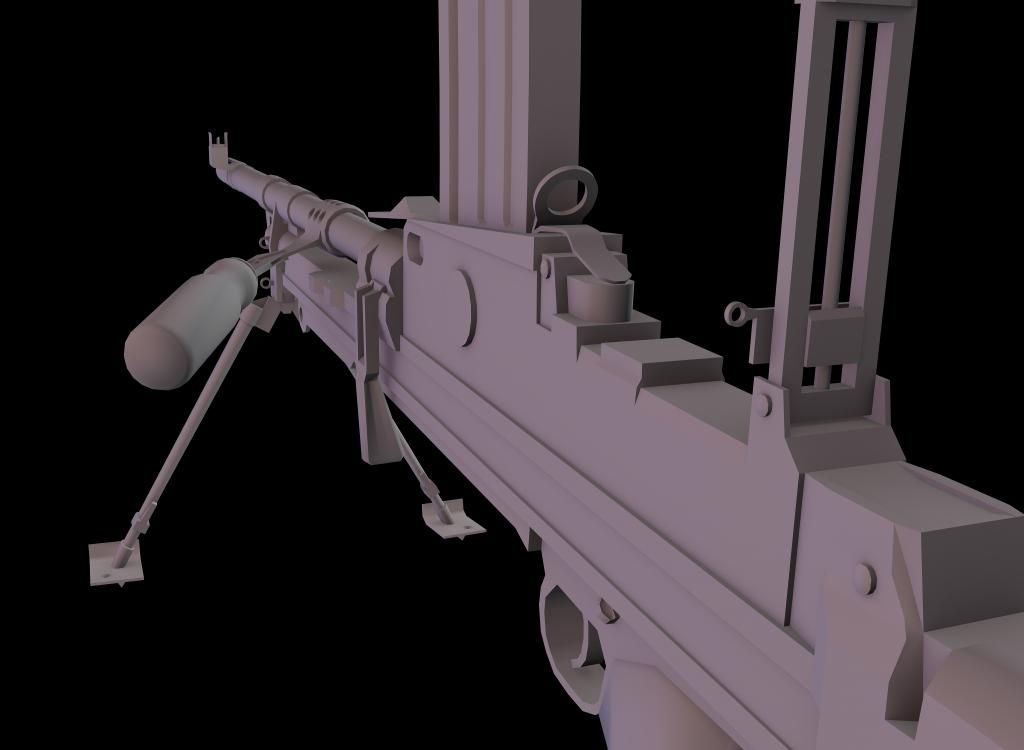
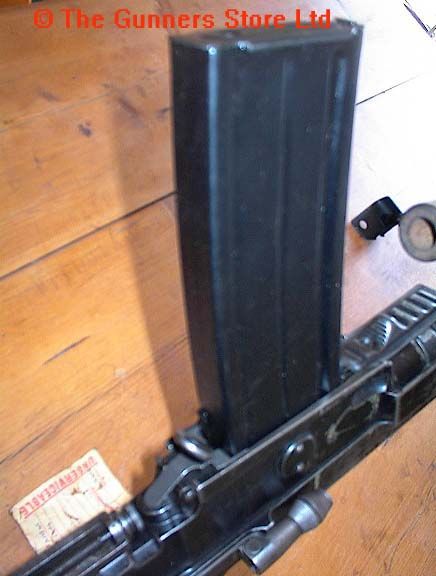
^I agree with overall scaling of the weapon. The proportions of the weapon are good, (I think?) but I agree scaling was off. I was going to do the same; use bullets to tune the mag. But here is my problems with that:'[R-DEV wrote:Rhino;1846751']One last thing (I think!) is that the mag should be slightly hollow to allow some 3D bullets (for 1p) to be in the top of the mag so that when the player reloads and checks the mag you can see them
It is my fault actually, i should have been more elaborate or at least quote Rhino's post from my thread after you respoded to me negatively. I see why you didnt get it from my post, it wasnt really elaborate{ZW}C-LOKE wrote:^ As for coning the inside of the flash suppressor, oops, I see what you were talking about now lucky... My bad! Yes this needed to be done. I thought you were talking about the other inner geometry of the flash suppressor... That didn't look right. But this ngon poly that Rhino pointed out, that's what you were talking about? Geeze I feel like a heel now.


AnimalMother. wrote:And Jesus Christ Rhino, that was one hell of a post. All them photos, firefox was using over a GB of memory for that!
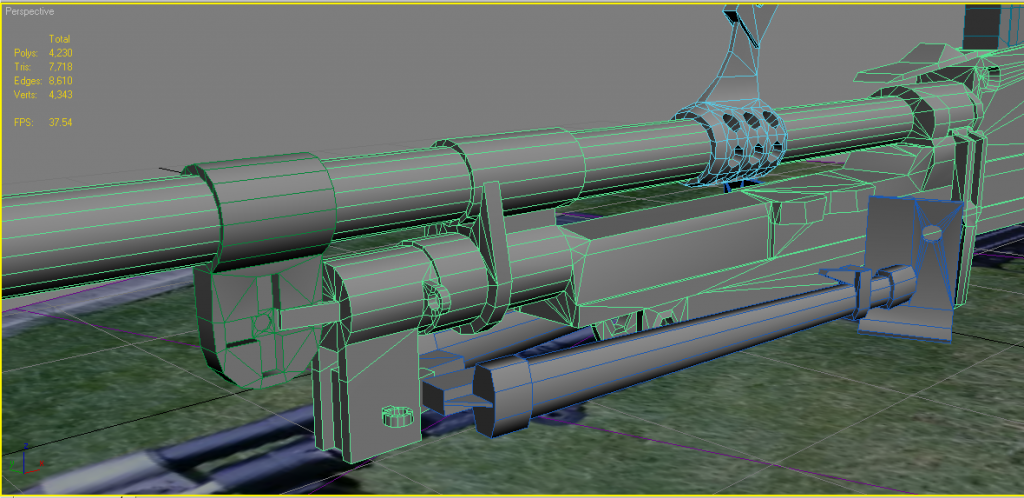
Not really, UVing is if anything harder with having lots of different objects because Max9 can't UV multiple objects at the same time without a script (that can be buggy).{ZW}C-LOKE wrote:As for welding the model up... I was under the impression that it would be easier to uvw unwrap and manage the wrap by keeping the parts separate (due to the hassle of smoothing groups/materials), as well as I was trying to keep in mind what would need to move during animations. Given, a good bulk of those parts don't move at all. Plus there was quite a bit of geometrical work that still needed to be done (apptly) to weld that up, so now I'm not so sure leaving all of that unwelded was such a good idea on my part. Hard to tell what would be best there, but I think I should go with your judgement on that one would probably be the wiser choice.
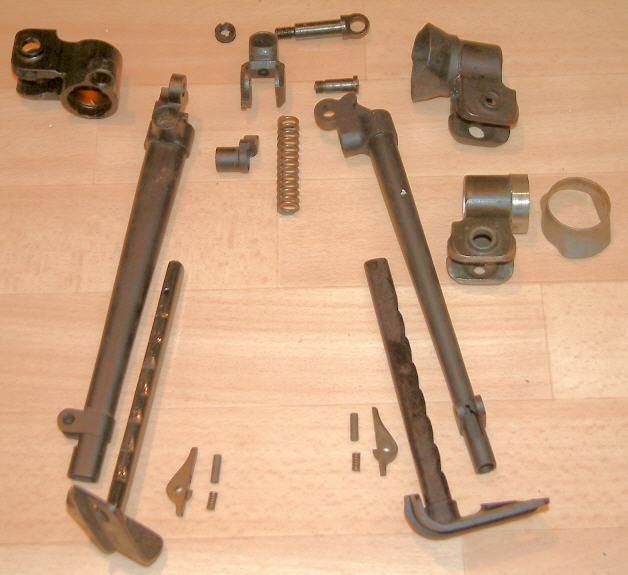
Ah ye that is right, my bad{ZW}C-LOKE wrote:As for the shell ejection port/cocking handle:
The shell ejection port is actually on the direct underside of the weapon, just forward of the trigger, as can be seen in the video offered by Adriaan. Given it's an MK2, but I would imagine the 1/3/4 are no different.
As for the cocking handle, yeah I agree, it should have been modeled, but I was thinking that because the 1p never sees the righthand side of the weapon except for a select moment when cocking the weapon after reload, all they would really see was a hand moving across the weapon and part of the handle(?); i.e., wasted geometry (or not?).
TBH, not worth it no as you rightly say, you will not be ever looking up the bottom of the gun, unless your another player looking at someone holding the weapon and your trying to look up there...{ZW}C-LOKE wrote:^Which brings me to one thing I would ask... Should I model the shell ejection port? It's on the underside of the weapon, and the only time it would ever be seen is when someone is standing directly below whoever is firing the weapon. 1p would never see it unless he was holding the weapon upside down, which is why I hadn't modeled it yet.


Ye, proportions I kept the same, just scaled it down to something like 37% iirc or something.{ZW}C-LOKE wrote:And now, for bullets:
^I agree with overall scaling of the weapon. The proportions of the weapon are good, (I think?) but I agree scaling was off. I was going to do the same; use bullets to tune the mag. But here is my problems with that:
You really shouldn't be importing models from BF2 if you can possibly avoid it, for anything more than just a ref but you might as well use BFMeshView or the BF2editor to view a model to see how it was made as importing it just imports it into a big mess most people can't work out unless you know about how to setup something for exporting to BF2.{ZW}C-LOKE wrote:First, I can't for the life of me find a working link to download the script for mesh import. Hence that's why I had never got around to the bullets part of the mag. All links thru google + that I've seen on the forum lead to dead ends, and are broken. Do you have a working copy of the meshimport script so that I can grab that and archive it on my external harddrive/googledocs?
Ye, but it isn't in PR's normal objects_client.zip since its a new thing we are doing, post v0.97, but it is included in the Falklands which you can find it here:{ZW}C-LOKE wrote:Second, by ammosheet, do you mean the .dds for the bullets, and if so, what is the folder location where can I find that in the objects_Client.zip so I can put it to materials?
EDIT: Upon opening the modified .max, it shows that there are two missing textures, complete with folder locations. I know where to look now. Cancel that!
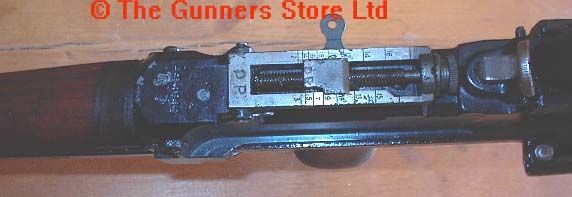
Ye, the problem was your mag wasn't wide enough to do this from what I could tell... You probably need to look into making your mag wider? This ref strima posted might help here:{ZW}C-LOKE wrote:And I think third on this, isn't the mag a 30 round mag, and if so, wouldn't it make more sense for the bullets to stack (visually) like there were two diagonally side by side in the mag (or am I wrong on this?)?
Take it you would **** it with your right hand then unlike the L85 that you tip and **** with your left? Probably a bit too heavy to do that, and mag would get in the waystrima wrote:You could get away with not going overboard on modelling the cocking handle too much for 1p due to the fact when cocking your head remains on the left hand side of the weapon and any trained user will automatically reach for and pop out the handle without looking.
Rgr good to know, although I dunno if we can have that in the animation so that it stays open after being fired, although we could have it open after being "deployed" (ie, weapon selected and the guy takes it up and sets it up for firing) then staying open, or we can have it like the GPMG and have it flicking open and close as you fire, but ye, dunno about staying open after firing...strima wrote:The ejection port cover flicks open when the working parts move forward on their first pass, it then remains open until closed by the firer.
strima wrote:Rhino's limited understanding of basic mechanical principles isn't too far off the mark for this real world item...
strima wrote:The whole assembly pivots between the guides as the user pushes forward with the heel of their palm whilst grasping the magazine with the thumb and fingers. The whole piece isn't linked but two distinct parts, I'll have to have a play with paint and do a rough description. I'll get back to you on that.
Awesome refs, desc, + drawing!strima wrote:OK, done a very rough sketch of how the mag release operates, hopefully it's clear enough but I have really bad art skills. It's a basic line diagram:
Good to know... As for verts, I watch that to make sure that when I weld, the weld takes place. Serves as a slight haptic feedback of sorts. Snap to vertice + weld does not always work, and you have to ride it hard to make sure it welds, often seems.lucky.BOY wrote:Also in the future post only triangle count of the model, as that is really the only useful information for seeing how much the model itself is stressing the engine. Good practice is to watch only this info when modeling to see how your changes affect the optimization. No need to watch vert and poly/quad counts in the future.
As for the magazine, I suspected it'd be staggered... I'll have to play around with the magazine/receiver to see if I can fix this so this is right.strima wrote:
The rounds in the mag are staggered as per the L85 mag.
The ejection port cover flicks open when the working parts move forward on their first pass, it then remains open until closed by the firer.
Right, magazine catch. I've found some more references but they aint pretty
Here's the thing... When I was modeling the camel back in 2006, I had the meshimport script, knew how to use it, and used it often to bring existing models into max so that I could examine various aspects... ones in which people just can't explain, you can't google about, and sometimes it's easier to just visually see models and export scenes in working theory action (although I agree, sometimes, more ofthen then not, the imported models are a mess). The only reason why I'm asking about the script is quite literally because I can't find a copy of it anywhere on the interwebz, and from time to time I open models of tanks, jets, helicopters, etc., and see real working examples of how others modeled and have their hierarchy/camera dummies/ painted vertices/tank tracks/ wheel dummies/ other things.[R-DEV]Rhino wrote:You really shouldn't be importing models from BF2 if you can possibly avoid it, for anything more than just a ref but you might as well use BFMeshView or the BF2editor to view a model to see how it was made as importing it just imports it into a big mess most people can't work out unless you know about how to setup something for exporting to BF2.
But the models are always filled with lots of errors that need fixing once imported so you shouldn't be using on your model. For these bullets I imported them into your scene from my ammo scene
Ok, so I just wanted to make sure that the right materials are assigned to the bullets that were imported into the bren scene. It's been a long time since I worked with materials, and esp. exporting a model for BF2 (2006ish/camel).[R-DEV]Rhino wrote:Ye, but it isn't in PR's normal objects_client.zip since its a new thing we are doing, post v0.97, but it is included in the Falklands which you can find it here:
\Battlefield 2\mods\pr\levels\the_falklands\objects_client.zip\ weapons\common\textures\ammo\ammo_c.dds
Got it... That's on my list and I'll see what I can do to satisfy yours and Strimas feedback on the mag, mag release, case ejection port related stuff. The latter I'm waiting for an affirmative answer as to how to execute. As for animations, that's a ways off; I was hoping to get a uvw unwrap, texturing, baking, geoms & LOD's first before doing the animation stuff though. I've definitely also been trying to keep that far ahead in mind from the very beginning.[R-DEV]Rhino wrote:Ye, the problem was your mag wasn't wide enough to do this from what I could tell... You probably need to look into making your mag wider?
If your just importing models to view them and using them as a ref etc to see how it was modelled etc that's totally fine. The important thing is you don't import a model to then use it on your model, for say importing the bullets off one weapon to be used on yours, since the model needs a lot of fixing up before it can be used on your model and in the case of the bullets, your best off getting them out of the orignal .max scene I made them in{ZW}C-LOKE wrote:Here's the thing... When I was modeling the camel back in 2006, I had the meshimport script, knew how to use it, and used it often to bring existing models into max so that I could examine various aspects... ones in which people just can't explain, you can't google about, and sometimes it's easier to just visually see models and export scenes in working theory action (although I agree, sometimes, more ofthen then not, the imported models are a mess). The only reason why I'm asking about the script is quite literally because I can't find a copy of it anywhere on the interwebz, and from time to time I open models of tanks, jets, helicopters, etc., and see real working examples of how others modeled and have their hierarchy/camera dummies/ painted vertices/tank tracks/ wheel dummies/ other things.
Most of the original "useful" tutorials for bf2 modeling are now dead links, and I can't find those either.
I was really hoping someone who has it (the meshimort script) could give it to me, because whoever has it has something that I can't find on the internet, that used to be able to, that I NEEED I NEED IT NEED I'm NEEDY lol... But seriously, gorey please with artillery on top?
I'll also look into BFmeshview
The BF2 editor is fine, you just need to know how to use it. However for a lot of the code we use in PR, the BF2editor simply doesn't recognise it and dose delete a lot of it out of a complex vehicle etc. At the end of the day, I just use it (when it comes to object coding anyways) as only a previewer tool basically as I just do all my coding by hand, then as I code the BF2 editor reloads the code I've changed.{ZW}C-LOKE wrote:As for BF2editor, I don't see why everyone has such bad things to say about it not saving correctly... There was a time where I had mine set up to correctly save the .tweak and .con files. It worked FLAWLESSLY. Never screwed anything up. If I ever figure out how to do it agian, I will write a tutorial on that because it saved me a lot of time.
This tbh isn't something that you really need to worry about at this time, although yes I would be setting this stuff up as I go but that's since I've done this all many times before{ZW}C-LOKE wrote:Ok, so I just wanted to make sure that the right materials are assigned to the bullets that were imported into the bren scene. It's been a long time since I worked with materials, and esp. exporting a model for BF2 (2006ish/camel).
The new bren scene, upon loading, says missing files from this location:
E:\Program Files (x86)\EA GAMES\Battlefield 2\mods\pr_repo\objects\weapons\common\textures\ammo\
and the two files:
ammo_b.dds
ammo_c.dds
I created a folder structure in drive C (where I have my bf2 install) all the way up to the \ammo\ and placed the .dds files in question in that location.
And yes, I'm running 64 bit as well.
My real question is this:
I just want to make sure that I assign the right materials to the bullets, and for that I understand I'll have to create a material slot for that, because as of now there is no material slot assigned to it (or that's "broken" between transfer between max workstations) either way I need to assign the materials to the bullets now. Can I just follow this thread (the materials section, step 4):
https://www.realitymod.com/forum/f189-m ... ost1786913
or are these instructions for materials placement ONLY for baking? If I can follow these, is there any particular folder structure I need to have the materials in when I finally do export (down the line)? Is there anything different I would need to do (because I'm not doing this as a baking scene yet)?
In short, if I'm way off base here, what steps do I need to take to make sure that the correct materials get placed to the bullets, in terms of making sure it references "...\mods\pr\levels\the_falklands\objects_client.zip\weapons\common\textures\ammo\ammo(_c & _b).dds" upon export? Or is this .tweak related?
Bottom line is there is no material slot set up for these textures/for the bullets (much less a slot actually assigned to the bullets), and I want to make sure that is not the case when I go to export (way later).
Sounds good{ZW}C-LOKE wrote:Got it... That's on my list and I'll see what I can do to satisfy yours and Strimas feedback on the mag, mag release, case ejection port related stuff. The latter I'm waiting for an affirmative answer as to how to execute. As for animations, that's a ways off; I was hoping to get a uvw unwrap, texturing, baking, geoms & LOD's first before doing the animation stuff though. I've definitely also been trying to keep that far ahead in mind from the very beginning.
Noice! Thank you sir.'[R-DEV wrote:Rhino;1847223']
Anyways the best import/export scripts that are available to everyone by far are the POE2 ones which you can download here: http://realitymodfiles.com/rhino/editor ... _0.30a.zip
I don't know why, but this all sounds so very familiar[R-DEV]Rhino wrote: The BF2 editor is fine, you just need to know how to use it. However for a lot of the code we use in PR, the BF2editor simply doesn't recognise it and dose delete a lot of it out of a complex vehicle etc. At the end of the day, I just use it (when it comes to object coding anyways) as only a previewer tool basically as I just do all my coding by hand, then as I code the BF2 editor reloads the code I've changed.
Nice! This is exactly what I was looking for on this...[R-DEV]Rhino wrote: This tbh isn't something that you really need to worry about at this time, although yes I would be setting this stuff up as I go but that's since I've done this all many times before
But ye, if you want to quickly setup the bullets, that's fine. TBH the simplest way of doing this is to first the POE2 BF2 tools above, restart max then in materials, select an empty material box, click on the eyedrop tool then click on one of the bullets, and it should take the old material off the bullets copied over from the old scene and put it into your material manager.
For more info however on BF2's materials, skip to "Step 7: BF2 Materials" in that tut you linked above.
Although tbh since I've written that I've changed the way I work with materials, now using multi/sub object materials, containing all the materials I use on the object then I split the materials using the material IDs, which ensures I don't have cloned mats and makes swapping different types of materials much easier, you don't run out of material slots and generally better management of mats.
I was thinking that would be the case... Thanks for all of these infos! Good stuff here.[R-DEV]Rhino wrote:The animations will eventually be done by Chuc, you don't need to worry about them, unless Chuc retires for good
But yes, the next step is UVing, the important thing is just to keep the different moveable parts separate, although you can attach them all to the base to UV then split them off later when it comes to export but normally when this is done something is screwed up along the way
I myself, would UV each component separately, all in non-normalized UVs so they are all to the same scale, then when you've got all the UVing done, use the multiUV script to UV all of them together to pack the UVs up


