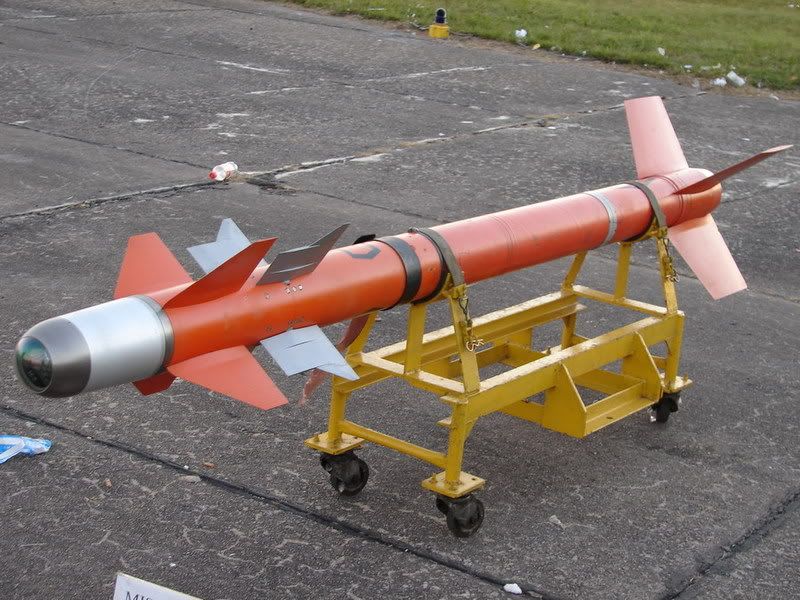
Hi there, this is my modell of the Matra R.550 Magic I air to air missile
[ATTACH]8150[/ATTACH]
I decided to go for a high tri model for lod0 as I think can easely manage some 150 or less for lod1
[ATTACH]8153[/ATTACH]
[ATTACH]8154[/ATTACH]
Then I unwraped UV's and applied a basic texture I made with this as reference, not at all acurate but is my first try also so...
[ATTACH]8152[/ATTACH]
I made little investigation as to the diferences between the Magic I and II but this and the one on the above picture seems to be accurate (though I suspect it is just a scale model)
And here the finished lod0
[ATTACH]8155[/ATTACH]
You do not have the required permissions to view the files attached to this post.
Nice work so far but there looks to be a few things that need to be cleaned up before going any further
First you seemed to have optimized the Nose Cone right at the begging where you generally want to start optimizing it once it reaches 1/2 the size of the largest part with collapsing every other edge, then again once it reaches 1/4 of the size etc. Here is the R.530 nose as an example, although tbh could have optimized it sooner:
Your thins look good although could possibly be optimized a little more without any real loss in quality.
Other than that, looks good and got any pics of the back of the missile?
Nice work, but a few small optimizations you can make
As per this little tut:
'[R-DEV wrote:Rhino;2054108']Then for optimization purposes you should look at collapsing every other face near the end so the edge size is around the same for the rest of the model:
On the nose first in Edge Selection Mode, select ever other edge circled in red and hit the collapse button to bring them down. Then in Face Selection Mode, select the centre face with the red arrow in it and hit collapse to turn it into a point. You then might want to move the new central vertex in or out a little to get the shape right:
But then you should be left with a nose a little more like this which has the same shape just with less tris: http://i.imgur.com/WM1gbNn.jpg
Thins look good but would collapse this edge marked in red and add a new line in green just to ensure the shape is right:
The back of your missile looks good but I would turn the inside into a cone with a lot more depth to it as it will save quite a few tris and give the impression of more depth to the end of the missile for the rear exhaust effect to fit inside too
Looks good, main little thing I would recommend is to add in a few edges around your new nose changes to ensure they are the right shape like so:
If you don't define them you can end up with something like this which isn't the shape you want:
Any chance we can see your UVs and texture sheet?
As for the amount of LODs, it really depends on the object itself. For the R.530 I made a total of 4 LODs, with the final lod just being a 3 tri spike which I would recommend for all missile like objects since the final lod just wants to be a basic shape of the object that is seen at extreme ranges:
For this just see how many tris you can cut down on each lod, remember that LOD1 is seen by low gfx users up close so it should just have the fine details removed while still keeping the main elements intact
Yep, nose looks good now but the UVs need a lot of work.
First of all you want to avoid the overlapping of different parts/thins as this seriously restricts what you can do with the textures. Overlapping the same type of part like the same thin and opposite sides of thins is good practice for the most part, unless they need text or something on them or have different AO Lighting or something else on them, but that doesn't look to be the case for this missile.
Note how both have been packed to utilise as much space as possible.
You should also have everything packed inside the main UV box since BF2 will not allow UVs outside of it when it comes to exporting.
EDIT: BTW I think you can probably loose the vert on the centre of the rear thin, doesn't look to be doing much and you can save a few tris with removing it.
Last edited by Rhino on 2015-02-26 22:09, edited 1 time in total.
You should overlap all your common thins since they don't need unique parts of the texture.
Also the missiles nose should be part of the main body, other than the tip which I would recommend doing as a head on UV.
You should also consider doing a 2:1, or possibly even 4:1 UV sheet so having a 512x256 or 128x512 texture so you can make the most of your missile being mostly a long thin item which is mostly taken up by the main body of the missile
There seems to be a bit of a language barrier getting in the way here. The easiest way around this is if you send me the .max scene of your missile over PM and I'll quickly do the UVs and AO Bake for you
Right here you can see I've done the basic UVs for the main body and one side of each thin:
And then for packing I ended up with this, had to squish down the main body a bit to make the most of the UV area which is something I would normally avoid doing but here it was the best alternative.
Then its a matter of cloning the thins so that they all use the same overlapped UVs of their thin:
Then just a quick AO Bake to give it some lighting and also helps show any errors on the UVs if there are any:
And now all that's left is doing the texturing, making the lods, exporting and coding
Any questions let me know and keep up the awesome work, very nice model and will PM you the new files in a min!
Also as for the colour, I don't think the ref your working off is very accurate. Here is a pic of one of the missiles on a Mirage during the Falklands War and you can see its much whiter etc:
I think this "27_135422_55e8391388fc2ce.jpg" ref is probably the best one to work off as its also got the nose protective cap removed and you can see the IR sensor clearly too:
Anyways keep up the good work and look forward to seeing your progress on the texture!
Nice! I see what you meant with overlapping all common objects now. I'll continue texturing and for future community development could you please point me to a good tutorial on baking textures. And thanks for the help sofar.
Some videos, first one isn't baking just setting up the lighting etc, second one is a diffrent method from what I use:
Personally I do it a bit different, I (normally) use no padding and do the padding manually in PS, I also use the LightingMap Channel since max9 doesn't have the MR AO one, and I use a .PNG format with alpha channel saved. Haven't watched it all, just quickly skimmed though it but the rest seems about right.
Anyways onto your missile and first of all, the preview shot you've taken, the camera is upside down? Check the X,Y,Z gizmo in the bottom left of the screen and you will see Z is pointing down where it should be up.
Here it is with the camera the right way up with your texture applied from your above post:
With rotating the missile +45degs on the Y axis the markings you've done are in the correct place for the right side of the missile and I've added them onto the right side too:
NOTE: Do not use the above textures however since they suffer from .jpg re-re-compression and are flattened, do this yourself on your own .psd to keep the highest quality and flexibility
Next these stripe around this grey bit here, I can't seem to find these on any of the refs I've got and the stripes are also not evenly spaced? I think its probaly best to remove them and most of the refs show a black bit there with a bigger grey bit between the yellow segment behind it:
Going off that ref too the rear of the missile seems to be a darker bluey grey than the front, with an even darker grey bit in the middle? Think that would be worth doing
Moving onto the nose and first of alli the sliver line should be at the tip of the front thin, going off the above ref where currently on your texture is quite far in front of it, then the bit in front of that should be a more whiter bit, and the silver bit just before the IR sensor on the nose should be a bit smaller, towards the front of the nose:
Then for the IR Sensor itself on the tip of the nose, would be good to have a bit more detail than just it being plain black. If you look at refs of it, or other IR missiles front on, with the protective caps removed, you will see the IR Camera
AAAAGGGHHHHH atention to detail! Hahahaha as you can see I'm just starting out in modding affairs so those tuts and feedback are coming in reall handy! I'll get right to work on the difuse texture and have something for tonight!
hehe nps, all in the detail, although I'm a bit too much of a perfectionist when it comes to that kinda thing hehe
And ye, nps with just starting out, that's what this task is here for since its quite an easy thing to learn the basics on and I'm happy to lend a hand on it


