[Weapon] Another USP [WIP]

Making or wanting help making your own asset? Check in here
Post Reply
_Henke_
Posts: 72
Joined: 2006-12-18 17:28

[Weapon] Another USP [WIP]

Post by _Henke_ »

I saw that someone is already working on an USP tactical. But anyway, here´s what I´ve managed to do. What do you think?

And be nice... This is the first thing I´ve ever done in any 3d program.

Just a quick question: How do I get the symmetry map to stay so I can edit things only on the other side of the gun?

And that black thing on the side. No mattter what colour I choose It´s always black.

Image

Image

Image
WNxLT7
Posts: 351
Joined: 2007-03-27 13:59

Post by WNxLT7 »

Looks beautiful! But I have no clue how to do any 3-D modeling so cant help you with the question.
BTW what program do you use?
Jarek Mace
Posts: 209
Joined: 2005-11-20 04:36

Post by Jarek Mace »

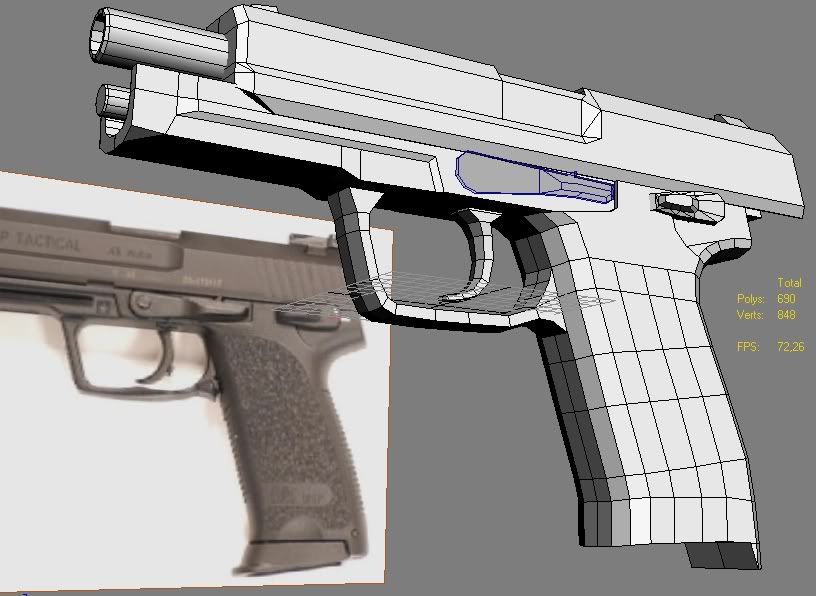
The black thing looks like a flipped normal. (you will need a max user, assuming this is max. to show you how to flip it back, I use maya). Normals are responsible for displaying the face direction, especially important on games modelling as the mesh is single sided. (only one side of the poly is drawn by game engine) you can use a technique called 'averaging normals' to make a line of polys look smoother (higher res), instead of orienting the face @90deg it will sample an average face orientation.

The polys on the side of the handle, you can delete the majority of edges saving around 36 polys. (again a max user will have to tell you how)

Modelling both sides at the same time requires a duplicate (instance) with a negative transform. Again I have no idea how unless it's in maya. For maya if you no longer wish to model symetrically you delete the history on the duplicate, again in max I have no idea, not very helpful am i? ;)

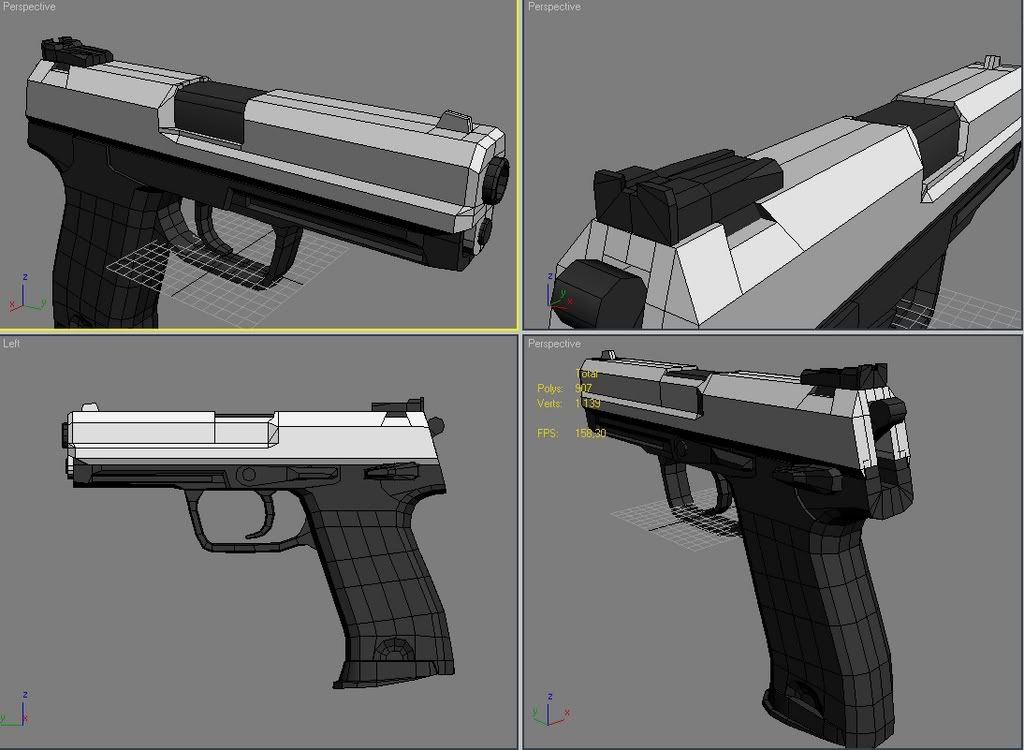
For a first it's well done mate.
Last edited by Jarek Mace on 2007-04-04 22:26, edited 1 time in total.
D_LaMz
Posts: 437
Joined: 2006-09-29 20:22

Post by D_LaMz »

very nice!
KP
Posts: 7863
Joined: 2006-11-04 17:20

Post by KP »

This is your first time? Very nice! Lots better than what I did my first time. :D

A few minor suggestions: Remove the edges along the side of the trigger guard and pistol grip. It'll save you quite a few polygons. Also, the rail isn't complete yet. See how it only goes outwards at the top and not at the bottom?

As for that black thing, I'm not sure.

@ WNxLT7: It's 3DS Max.
Image
More guns and bullets make bad guys go away faster,
which in turn makes everyone in the area safer.

-Paul Howe
_Henke_
Posts: 72
Joined: 2006-12-18 17:28

Post by _Henke_ »

Yes I´m using 3Ds max

Here´s a small update with the bottom of the mag. still needs some adjustments
And I´m saving the polys on the handle so I can make it smoother if I want.

Image

Also I´m trying to find good pics from different angles of the red and the green area. If you happen to have any it would help alot.

KP: I don´t really understand what you mean with the rail, do you mean the thing that should be in the yellow area?

Jarek Mace: Thanks for the tips.. I´m gonna see if works in 3ds max,, well try to atleast
KP
Posts: 7863
Joined: 2006-11-04 17:20

Post by KP »

Looks good. Just remember that most of the pistol grip will be hidden by the player's hand, so it doesn't really have to be so smooth. Anyway, you could still remove some edges on the side of the trigger guard.

And the rail is the yellow area, yeah. It's for mounting flashlights, laser sights, etc.

For reference images, try this site: http://www.imagestation.com/members/DeicideNBF
Image
More guns and bullets make bad guys go away faster,
which in turn makes everyone in the area safer.

-Paul Howe
Jarek Mace
Posts: 209
Joined: 2005-11-20 04:36

Post by Jarek Mace »

Oh that's maya right?

Select the black faces > edit polygons > normals > reverse normals.

To delete history, edit > delete all by type > history.

Forget max if your using Maya either program will do you.
D_LaMz
Posts: 437
Joined: 2006-09-29 20:22

Post by D_LaMz »

_Henke_ wrote:
Also I´m trying to find good pics from different angles of the red and the green area. If you happen to have any it would help alot.

Image

Those are adjustable sight, but I would rather put Novak sights since they are easier to do and look better. :)
Image
Image
Image

more here http://www.novaksights.com/index.htm


Also, about 3Ds Max where can you get it? Is it free?
KP
Posts: 7863
Joined: 2006-11-04 17:20

Post by KP »

D_LaMz wrote: Also, about 3Ds Max where can you get it? Is it free?
Gmax is a free version of 3Ds max, with less features (such as rendering and exporting). You can download it from here: http://www.turbosquid.com/gmax
Image
More guns and bullets make bad guys go away faster,
which in turn makes everyone in the area safer.

-Paul Howe
_Henke_
Posts: 72
Joined: 2006-12-18 17:28

Post by _Henke_ »

D_LaMz: Thanks alot for that first image of the sight, Its just what i´ve been looking for. And I think I´ll skip the novak sights cause I want the "tactical look"

Edit: Here it is! I´m almost done modelling. Now I just need to learn how to skin... :-(

Do you know any useful guides?

Image

Image
Last edited by _Henke_ on 2007-04-06 18:06, edited 1 time in total.
requiem
Retired PR Developer
Posts: 3651
Joined: 2004-07-22 16:00

Post by requiem »

A lot of those polies in the middle of the grip are unnecessary, you also have T-junctions, otherwise it's looking good.
D_LaMz
Posts: 437
Joined: 2006-09-29 20:22

Post by D_LaMz »

dayum, that is nice!
_Henke_
Posts: 72
Joined: 2006-12-18 17:28

Post by _Henke_ »

Yeah, im gonna clean up those polys later. But "T-junctions" what is that?
00SoldierofFortune00
Posts: 2944
Joined: 2006-02-28 01:08

Post by 00SoldierofFortune00 »

Make sure it is in all black too. Silver would reflect in combat and is more noticable.
"Push the Envelope, Watch It Bend"

Tool ~ Lateralus
Fullforce
Retired PR Developer
Posts: 3751
Joined: 2005-10-17 17:03

Post by Fullforce »

Make a USPc and I will love you for ever ;)
Jarek Mace
Posts: 209
Joined: 2005-11-20 04:36

Post by Jarek Mace »

T junction is a split edge ending in a T shape when you could have placed the end vertex onto another vertex, efficient modelling aka good topology.
see pic

Next stage is to lay out the uv's for texturing. google uv mapping.
You do not have the required permissions to view the files attached to this post.
Post Reply

Return to “PR:BF2 Community Modding”