Page 5 of 9

Re: [WIP] FMK-1 & FMK-3 Mines (PR:F)

Posted: 2013-08-16 20:31
by 3===SPECTER===3
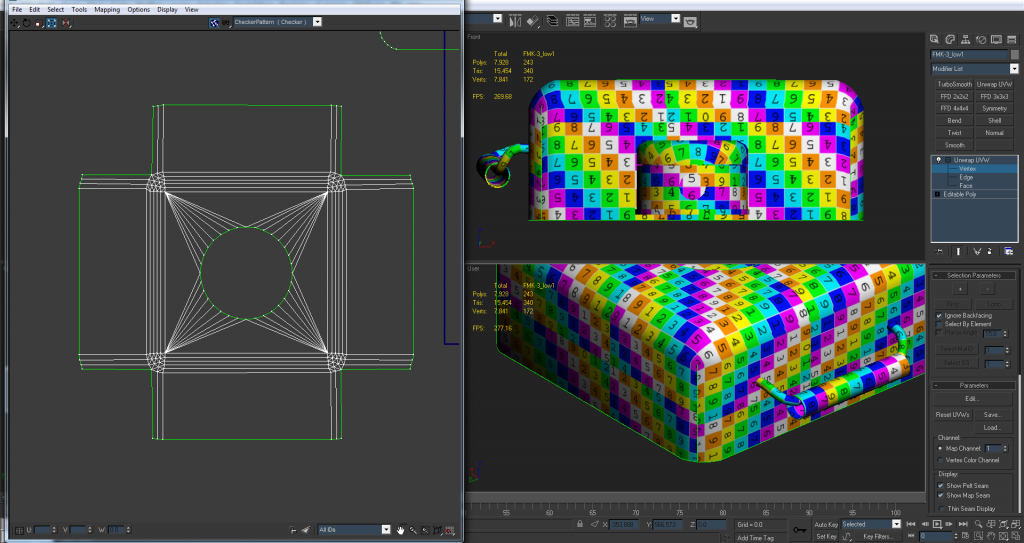
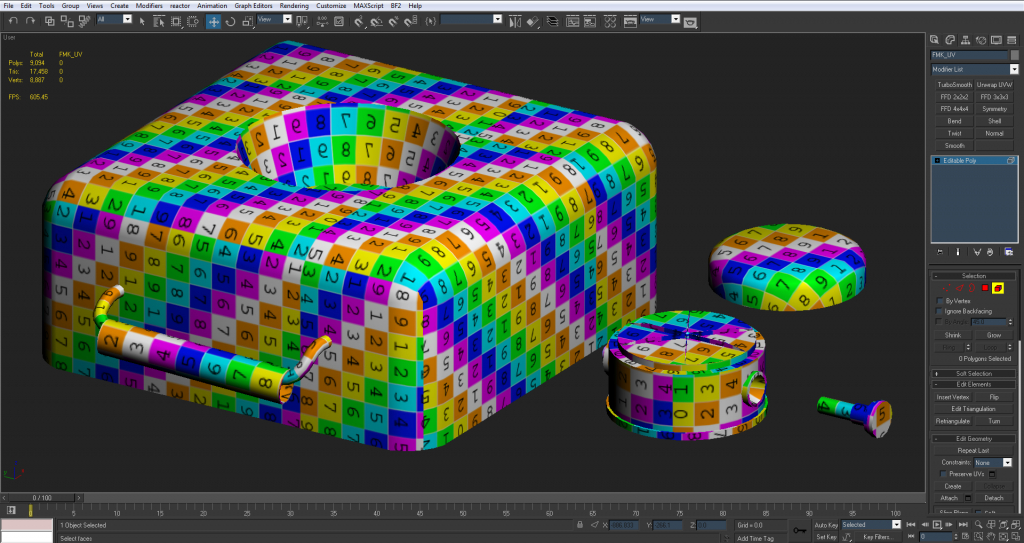
Thanks for the feedback Rhino, and is this more along the line of what you were talking about with the FMK-3?Image

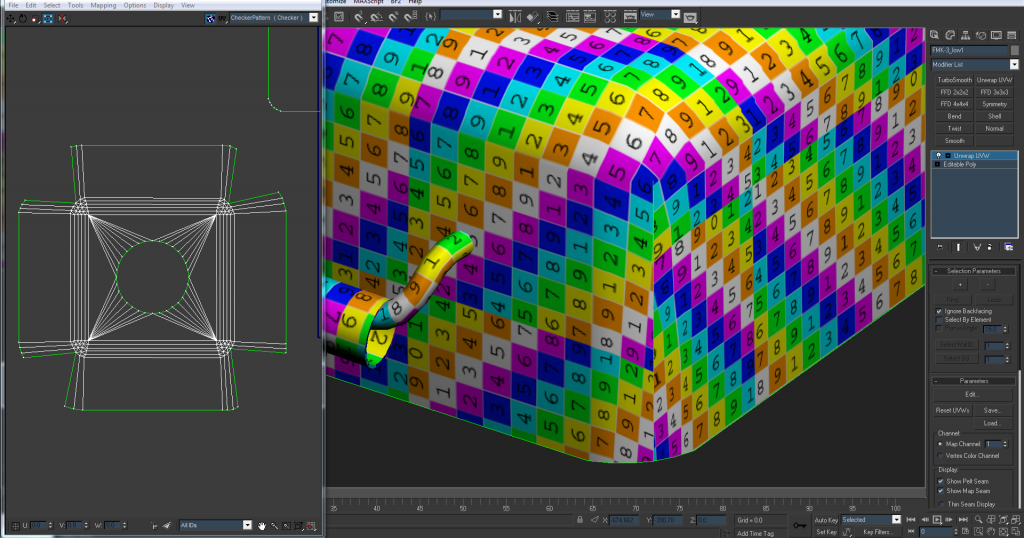
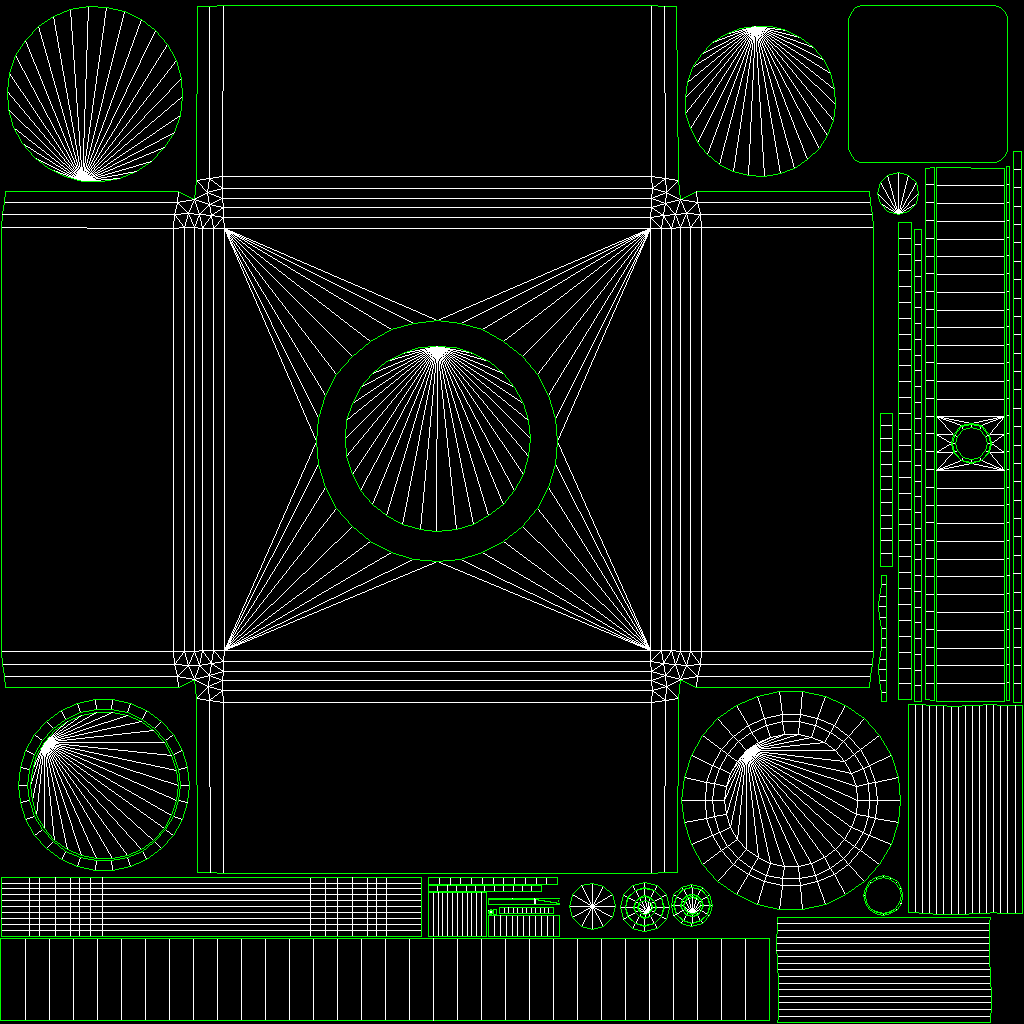
I made it so there's only one seam on each corner down the middle and on the lower half. This way it'll be less visible to the player if they see it.

Image

this still causes some distortion but its not TOO bad and it's only towards the lower half of the model. I could try and manually relax it some more, but it looks as if this is as close to as good as it'll get.

also those smoothing errors I was talking about before were caused by some unwelded verts that I didn't catch. They're all fixed up now tho :grin:

EDIT:
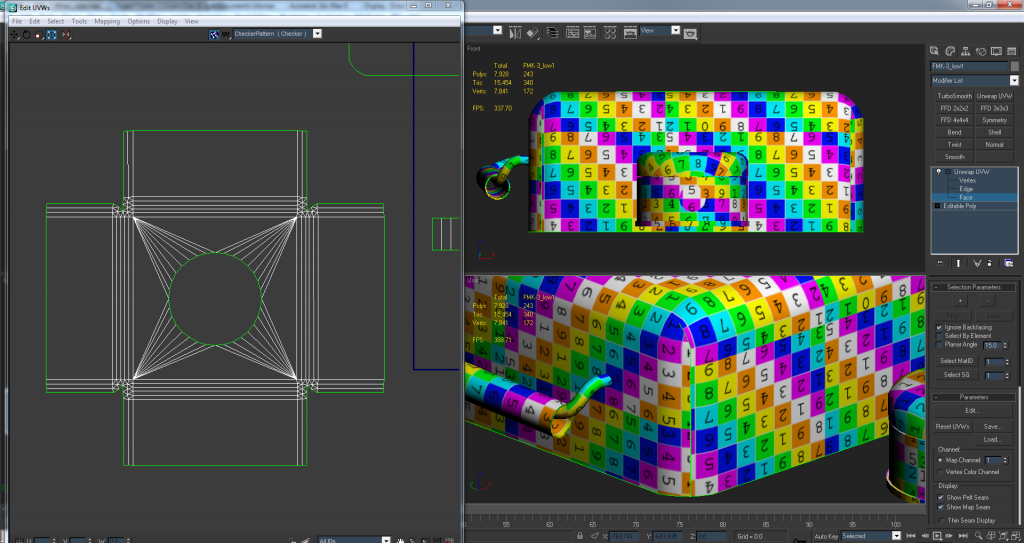
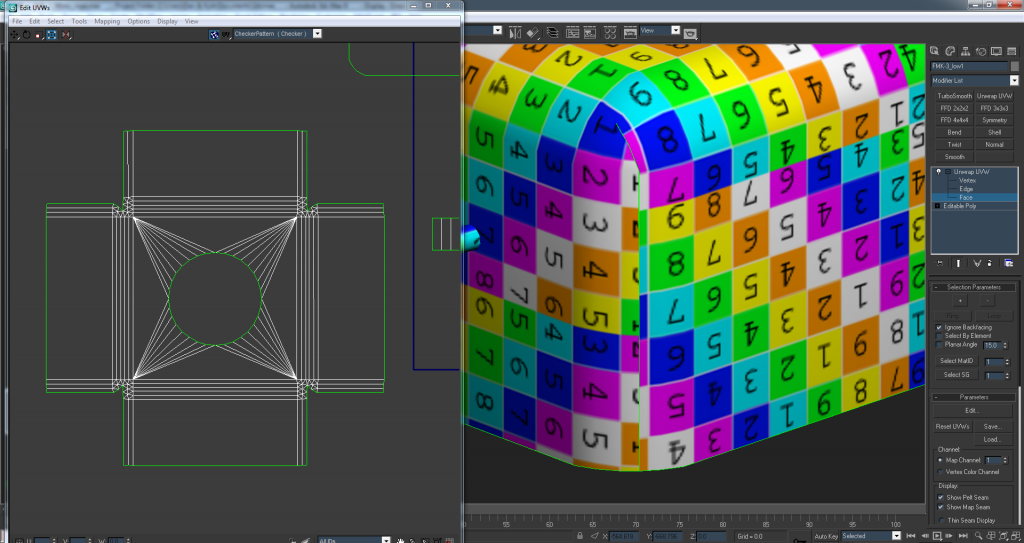
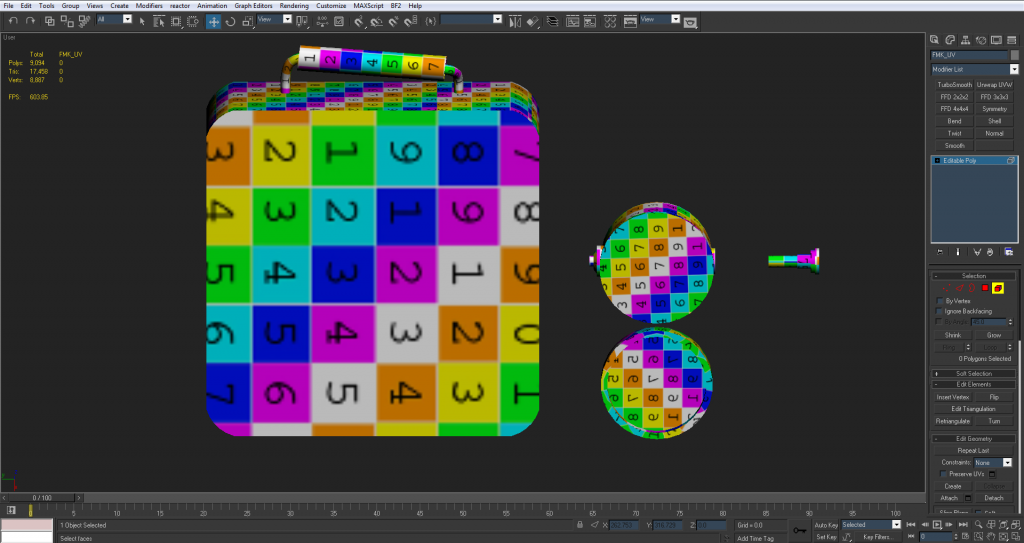
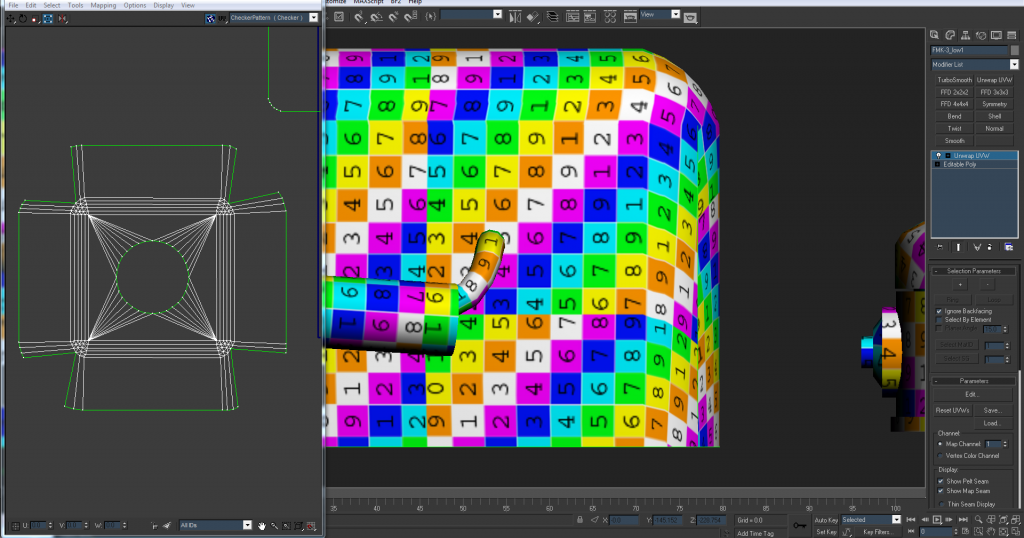
Actually after fixing up those unwelded verts it gave me the ability to relax it more, so there's even less distortion next to the seams.

Image

The seam is still there but there's less distortion around it.

Re: [WIP] FMK-1 & FMK-3 Mines (PR:F)

Posted: 2013-08-16 20:57
by Rhino
I dunno how your doing your stitching but your messing it up quite a bit...

Really quick tut on how I would UV this quickly and effectively.

Made a quick box just like yours but with out the inner bevel etc:
Image

Added a UV Unwrap modifier, went into face selection mode, selected all faces of the box (although you will only want to selected the top, bottom, sides and the chamfers) and then did a Mapping > Flatten Mapping and used these settings:
Image

Which dose most of the work for you and gives you a result like this:
Image

Going from the top, in Edge Selection mode select one of the main edges on it, then go Tools > Stitch Selected, use default options and you've got your first side stitched on, repeat for the others:
Image

Till you've got something like this:
Image

Then its just a matter of stitching the corners together using the same methods like so:
Image
Image
Image

And then you might want to manually clean up the corners a little:
Image
Image

And after doing the other corners in the same way your done :)
Image

And your pretty much done, although using the Flatten Mapping with a angle of 45 will mean slightly stretched corners you can fix them up manually after too or you can use a much smaller angle of like 5 or something but you will have much more bits to stitched up.

Re: [WIP] FMK-1 & FMK-3 Mines (PR:F)

Posted: 2013-08-16 21:57
by 3===SPECTER===3
I followed your tut and did it your way and came out with pretty much the same result as the edit on my last post.
Image

It might be a little bit better than before actually. Not alot of warping and the same seam as yours for the most part
Image

EDIT:
actually if I take the seam a little further up the corners its a little more like yours... less distortion at the bottom but more seam
Image

Image

Re: [WIP] FMK-1 & FMK-3 Mines (PR:F)

Posted: 2013-08-16 23:17
by Rhino
Is your base slightly bigger than the top if there was no chamfer? Only reason I can think of too why your edges would be twisted like that, even in your last image they are not 100% straight. But ye, last img is good, although I would weld that very top one myself as a IMO, a tiny bit of distortion is worth it for no seam :)

Re: [WIP] FMK-1 & FMK-3 Mines (PR:F)

Posted: 2013-08-16 23:36
by 3===SPECTER===3
[R-DEV]Rhino wrote:Is your base slightly bigger than the top if there was no chamfer? Only reason I can think of too why your edges would be twisted like that, even in your last image they are not 100% straight. But ye, last img is good, although I would weld that very top one myself as a IMO, a tiny bit of distortion is worth it for no seam :)
I don't think it is.. I used a box to start out with so they should be the same size. :? But yea I'm gonna wind up welding that so the seam doesn't go up too far because as you said, it'll be easier to deal with the distortion when I texture this than it will be to deal with the seam. Although I think I can make that work too.

I think I'm gonna move onto packing this now and seeing what UVs I can scale down a bit and which ones I can overlap on top of each other.

How do you guys recommend packing this? Should I pack it into an invisible square first before scaling it? Or should I scale it down into the 'blue box' so that my biggest part (the FMK-3) fits the way I want it to and then pack everything else from there?

Re: [WIP] FMK-1 & FMK-3 Mines (PR:F)

Posted: 2013-08-17 03:06
by 3===SPECTER===3
Little update: I started packing the UV's into a square. spent a few hours on it and this is what I tenatively came up with.

Image

I just exported these out real quick and I have the unpacked one's saved cause I'm sure I'll need to do a few more iterations of this.

Because of all the circles its tough to maximize all the space. I've overlapped everything I can and scaled things only slightly.

Image

The only thing that's scaled majorly is the bottom of the FMK-3 as you can tell (in the upper right corner of the UV map) :lol:

Image

as you can see the scaling is pretty large. I knew that I would be able to scale that quite a bit because on the first person the player will probably never see it. (will have to keep it to scale on the third person tho as that will be seen alot.) I didn't wanna end up scaling it as much as I did but it causes ALOT of trouble considering all the circles.

Taking into consideration how little it will be seen by the player, what do you guys think of this initial UV pack? Are the islands too close together? do you think you could suggest a way for me to pack it a bit better? etc...

also right now this is at 1024x1024. @Rhino idk what texture sheet you want it to be eventually but I just did this as a test.

Re: [WIP] FMK-1 & FMK-3 Mines (PR:F)

Posted: 2013-08-17 09:41
by Rhino
3===SPECTER===3 wrote:How do you guys recommend packing this? Should I pack it into an invisible square first before scaling it? Or should I scale it down into the 'blue box' so that my biggest part (the FMK-3) fits the way I want it to and then pack everything else from there?
I personally recommend packing into an invisible square before scaling down, with scaling down at the last min as its much easier to work with. You can also attach a dummy square (or rectangle if your working in 1:2 or w/e) plane onto your model which you can scale up and down to give you an idea as your dummy border too.

As for packing, I find what works best is packing the largest objects first with then filling in with the smallest :)


As for your UV you've done, you really need to work on your spacing of UVs. Just because something is smaller doesn't mean its going to be any less affected by pixel bleeding. I suggest you read this info post: https://www.realitymod.com/forum/f189-m ... eding.html

Also before I forget, I recommend you add a vertex into the middle of your FMK-1 cover top face, will help a bit the smoothing. Even thou yes I know the normal will take care of most of it, its a couple of extra tris that will help regardless, and you can also move the central vertex up a bit to give it an even more rounded feel :)
Image

BTW for posting your UVs I recommend using Texporter which you can download from here, much better, just remember to uncheck backface cull etc before rendering: Cuneyt Ozdas Software

As for your packing itself, it could be a lot better. Yes you've got a lot of circles in there but the truck there is to place circles next to each other as they connect quite well and then fill in any gaps with smaller objects. But ye, your edge placement etc isn't too good either. I can't really show you a better pack without doing it myself but have a few more tries and see if you can get it first.

keep up the good work! :D

Re: [WIP] FMK-1 & FMK-3 Mines (PR:F)

Posted: 2013-08-18 06:24
by 3===SPECTER===3
Quick question. I've heard that stitching up faces on different smoothing groups is unadvisable. (As in you wanna keep them spaced apart on separate UV islands. Why is this? does it cause bad smoothing errors?

The reason I'm asking is because it'd be nice to stitch up the entire base of the FMK-1, except the top and bottom circles (the object on the right side of my previous UV sheet) just wondering.

Re: [WIP] FMK-1 & FMK-3 Mines (PR:F)

Posted: 2013-08-18 07:16
by Psyrus
3===SPECTER===3 wrote:Quick question. I've heard that stitching up faces on different smoothing groups is unadvisable. (As in you wanna keep them spaced apart on separate UV islands. Why is this? does it cause bad smoothing errors?

The reason I'm asking is because it'd be nice to stitch up the entire base of the FMK-1, except the top and bottom circles (the object on the right side of my previous UV sheet) just wondering.
Spoiler for Help:
'[R-DEV wrote:Rhino;1786913']
Step 3: UVing your low poly 3p models

Now for UVing these objects you basically need to UV them in pretty much the same method you would UV a normal object but the only real difference is that your going to be UVing all these components onto the same sheet. How you go about this is up to you but what you need to end up with is all the components of this weapon series all UVed onto the same sheet, so all the L85 bits, L86, L22, AG36, all the scopes and other attachments need to be all on this single texture sheet.

I'm not going to go much into UVing methods so if you need to learn about UVing here is a pretty good tutorial: Creating a Weapon For Source download - Mod DB

There are a few thing you need to keep in mind when UVing objects for Baking which as a result you need to change a little bit on how you do your UVs.

The first thing is that you shouldn't have any overlaps on your UV as overlaps will come out really bad when baking as it will basically render the same/diffrent texture twice onto the same bit and even if the textures are excatly the same, the result will be diffrnet from if it wasn't overlapped, screwing up the baking. Different components mind you can be overlapped if the same and then you just have to fiddle around with them a little when you put all the baked textures together in photoshop but parts of the same mesh/component that are overlapped will come out really funny on the bake. Its possible to get around this either by hand painting or by only baking one bit by detaching it and baking it but this is only really worth it if your going to be saving a big chunk of space on your UV. So keep this in mind when your UVing and ask yourself if this this bit is really worth overlapping or not? Also keep in mind that one bit you might want to overlap might have a different texture on the main mesh and if so, the 1p and 3p models wont look the same which if its a large bit of the mesh could be a big issue.

The next big thing you need to keep in mind is that you can't stich bits of the model together with diffrent smoothing groups. If you have your UVs stiched together your normal (bump) maps will not come out right and there will be a big line/seem on the stiched part where two diffrent smothing groups meet.
Here's a quick example just encase your not sure what I'm on about using the butt of the SA80 rifle.
First of all the Smoothing groups, the top face uses smoothing group 3 (shown in blue) while the back (and underside) of the rifle uses smoothing group 2 (shown in red). As you can see the two smoothing groups meet at the very top of the back of the rifle.
Here is the stiched UV:
Image
And in the render of the model after its been baked with a stiched UV, we can see a big black seam across where the two smoothing groups meet.
Image
Now here the un-stiched UV:
Image
And in the render of the model after its been baked with an un-stiched UV, we can see a big black seam across where the two smoothing groups meet.
Image
Stiching UVs is something on a normal UV that is not having a texture baked to is something you should do at every oppitunity to make it as easy for the texture artist as possible to match up the textures on diffrent parts of the model. While this is some what still true for baking textures you should still stich up the UVs as much as possible, just dont stich up the UVs between two diffrent smoothing groups so make sure you know where your smoothing groups are and that you do not stich them up otherwise your normals are going to look totally rubbish and nothing like as good as they would otherwise. Even thou your UVs are not stiched, you can still put the faces that would be joined together much closer to each other than you would for a normal UV as any texture bleeding wont matter because the textures are the same on both sides, just make sure you have the right faces, the right way round next to each other. Simplest way to do this is to stich up your UVs then brake them at the points between two diffrent UVs.

https://www.realitymod.com/forum/f189-m ... apons.html
This should explain it :)

Re: [WIP] FMK-1 & FMK-3 Mines (PR:F)

Posted: 2013-08-18 07:22
by Doc.Pock
since your normalmapping it anyway, dont bother with getting smoothing groups too look nice, just use a script like textools to set different smoothing groups to UV islads and thats it. in my experience it works best, plus it reduces the vertex count of your model. (every UV seam or hard edge doubles the vertexes around it).
you can see ig great here, where i didnt really care about the look of the lowpoly, as the normal map does that.

Re: [WIP] FMK-1 & FMK-3 Mines (PR:F)

Posted: 2013-08-21 22:50
by 3===SPECTER===3
Another quick question: can texture sheets be any ratio? i.e. Right now it seems easier to fit the UVs into a rectangle rather than a square, but can that rectangle be any ratio? or does it have to be 2:1?

BTW: quick update of the UVs in their current state. Still very WIP but it relates to my question.Image

Re: [WIP] FMK-1 & FMK-3 Mines (PR:F)

Posted: 2013-08-21 23:03
by CTRifle
Yes they can, so it could be like 1024x512 ect ect

Re: [WIP] FMK-1 & FMK-3 Mines (PR:F)

Posted: 2013-08-21 23:36
by 3===SPECTER===3
CTRifle wrote:Yes they can, so it could be like 1024x512 ect ect
I mean not an exact 1/2 ratio tho, like 512x920 or something. (1/1.8 for example)

Re: [WIP] FMK-1 & FMK-3 Mines (PR:F)

Posted: 2013-08-21 23:48
by CTRifle
I've never seen any textures that don't use 512 or 1024, I'd just use one of those. Idk if there is an actual rule tho

Re: [WIP] FMK-1 & FMK-3 Mines (PR:F)

Posted: 2013-08-22 00:09
by Rhino
Your pack is looking much better on the whole but still a few small pointers, note not all may work perfectly can't really tell until I moved stuff around myself but providing there is enough spacing between the UVs these should be good and should give you an idea of some of the tweaks you can do which will open up a bit of space for other stuff and doesn't show everything you can do either but you can see from the examples the main bits you can try :)

Image
3===SPECTER===3 wrote:I mean not an exact 1/2 ratio tho, like 512x920 or something. (1/1.8 for example)
Like CTR said, you can have textures in a 1:2, 1:4, 8:1, etc ratios BUT each value must be a power of two (8, 16, 32, 64, 128, 256, 512, 1024, 2048 ) so you can have a 8x2048 texture for example, but you can't have a 300x400 texture.

If you need to use some space up just increase the rez of some of your UVs :)

EDIT: and as lucky said, could decrease the size of the underside UV, as well as possibly increasing the size of the FMK1 but looking at your current pack I think 2:1 ratio is the way to go for this :)

Re: [WIP] FMK-1 & FMK-3 Mines (PR:F)

Posted: 2013-08-22 00:18
by lucky.BOY
I'd stick to powers of two, there was some problem with other sizes IIRC.

One thing to keep in mind is that a rectangular texture sheet is always "in between" square ones, when it comes to memory consumption. You see, a 512x1024 sheet is twice as big as a 512x512 sheet, and half as big as 1024x1024.

In your case the two big UV clusters from the FMK3 would be determinal to how much you must scale your things down to fit in a UV box. One possible fix would be to put a edge down the middle of the bottom face, and break the cluster along it. This will give you much more space to work with, texturer will wrap his head around it, and it will make it much easier to pack it into a square.
Oh and, scale that cluster down, maybe not so vigorously as on your prevous screens, but it certainly doesnt need to have the same resolution as the upper part.

E: Semi-ninja :P

Re: [WIP] FMK-1 & FMK-3 Mines (PR:F)

Posted: 2013-08-22 01:34
by 3===SPECTER===3
Quick little update: I packed it into a 2:1 rectangle to see what space I can work with. I have alot more space so I'm gonna see what happens when I scale some things based on what the player is gonna see.

This is a 2048x1024 sheet btw, probably one scale bigger than what itll actually be?

Let me know of any other comments other than what I posted.

Image

fyi there are some small parts that are like 2 pixels wide and dont even render.

EDIT: and yea 2:1 seems to make sense to me since this is pretty much 2 weapons on one sheet

Re: [WIP] FMK-1 & FMK-3 Mines (PR:F)

Posted: 2013-08-22 01:42
by CTRifle
Yes itll get shrunken down to 1024x512

If you scale things up, that will make some parts stretched compared to others if you get what I mean

Re: [WIP] FMK-1 & FMK-3 Mines (PR:F)

Posted: 2013-08-22 01:46
by 3===SPECTER===3
CTRifle wrote:Yes itll get shrunken down to 1024x512

If you scale things up, that will make some parts stretched compared to others if you get what I mean
Yea ik. But from what I understand its a better idea to scale up things that the player will see more and give them more resolution and scale down things that the player will almost never see. (Like the bottom of the FMK-3) I think that's overall a better strategy when something needs to be compressed to go in game than keeping everything at a one to one ratio.

Re: [WIP] FMK-1 & FMK-3 Mines (PR:F)

Posted: 2013-08-22 01:51
by CTRifle
Yea that makes sense ;)