Generally speaking, you will not see the missile, shell, or bullet that kills you. In order to increase your chances of survival, you must know where the threats are. This is a guide not for prevention (by far the best choice, and one I hope to touch on in the future), but how to survive and defeat surface to air defences in a high threat enviornment AFTER being acquired.
Where are the threats?
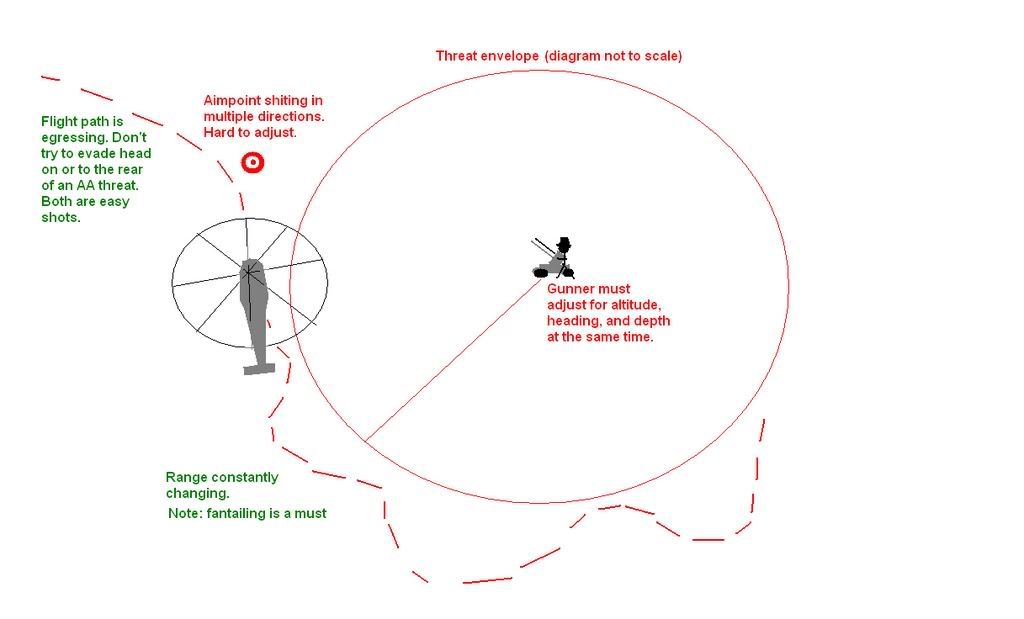
Down and to the rear is your most vulnerable position. You present the second easiest target (apart from head on) and there is zero chance of evasion, unless the shooter misses and you react. I used to simply break away from the gunner as soon as i saw the tracers, and I used to always die. It took awhile but I began to use the AA guns to get a new perspective and I realized how easy I was making it for the AA. breaking in a smooth bank away or towards caused me to face either directly away or towards the AA gun, an easy shot (particularly with missiles and the new draw distance). So always fly TANGENT (diagram) while ingressing or egressing away from a known threat. Why? Being perpendicular the the threat makes you a more difficult target for several reasons:
1. IR Missiles in BF2 will track with great difficulty as they are pure pursuit. (This is of course subject to change). Add flares and you can relax cruise easy.
2. Shooters must lead you the most while you are perpendicular to them, and the least in a head on shot. The more they lead you, the slower their aim can adjust to your velocity.
3. Allows you to voluntarily change the depth of the shooters aimpoint by breaking left or right. This means that you can cause a shooter to believe they are aiming properly, when they are in fact leading too much or too little. If you break away from the shooter in this case, they will not adjust as quickly as the eye can't detect depth as readily as vertical or horizontal motion.
4. You may egress from the threat envelope without any further risk, as you are already headed away from the shooter. You chances of survival increase with every milisecond that you manage to evade.
You will discover quickly how much easier it is to survive an encounter when you have a suffient altitude and airspeed. I watch pilots regularly fly into a known threat envornment at low speed or altitude. Altitude is stored energy and can be used at your discretion. This is usually a result of either not seeing the threat or not recongnizing it.
How do you identify each threat?
1. Where's the nearest life/ death?
Where is it coming from? Look at the angle of the incoming tracers, if its coming from above you, hit EJECT, because its a MiG (Jets should be the only thing above you, anything else and your'e playing with fire).
2. Use your map
Your heart should skip a beat when you hear "HOSTILE ANTI-AIRCRAFT SPOTTED". Check your map every few seconds. Learn how to stay level while checking the map. CHANGE THE TRANSPARENCY ON THE MAP SO YOU CAN FLY AND LOOK AT THE SAME TIME. *ahem*. The payoffs are worth the time. Build a mental library of anti air positions and review them mentally while you are cruising or loading passengers. The mentallity should be "I should ALWAYS know where EVERY anti air position is".
3. Tracers size, speed and color.
Faster, smaller, and whiter and you should breath a sigh of relief. Thats the smallarms stuff, ignore it, it can't hurt you. Don't panic at the first round, just look for the infantry and check if the target is under cover or not. If not, the onus is on you to engage.
Long, Red, fast tracers and you need to worry. Don't panic just get altitude and egress. Those are .50 calibre rounds and can kill you with around 20-30 rounds.
Big, Fat, Long, Slow, yellow tracers are APC's. You should be sweating a little here. But if you've ever used the guns on an apc, the you should know that they're twitchy and thats how you should evade them. Make him make a mistake, you still have and advantage.
Long, greenish white, fast tracers that for some reason don't seem to be tracking you properly (that will change in a second) are stationary anti air guns. These are a gift and a curse for a few reasons. For starters they have no aimer, so you've got between 3-5 seconds to panic and cry before you're dead. Next, they are stationary, so killing them with a 2.75 rocket is almost fun (qwai is always a party for me). The gunner is also exposed, so you can miss by ten feet and still kill him (unless some fortunate riflmen is blessed with the honor of decapitating him first). But they have long range, and once you take that first hit, the gunner can adjust, so don't stop moving. But you always know where they are, so just keep building your mental library/ map. (I've found that most gunners get sick of being sniped out so you won't need to worry about these unless you're really unlucky.)
4. The SAM threat: How to make his 20% missile hit percentage even worse.
BEEP BEEP BEEP! Oh hell there goes my perfect k/d ratio! Better request a new kit because you were just killed by an SA-7. You know its an SA-7 not because you can see it, but because you can't find anything else (like you have time to inventory the enemies arsenal). If its a SA-7, he is most likely A) in buildings, or B) in trees (I know there are many places, but theses are the most likely. Hey life's imperfect). The solution is the same for both. Break low and head to the nearest edge of the map. This will turn his use of concealment against him, and you can slip away.
BEEEEEEEEEP! Ok this is the same as the first one, but the difference is that you will not have time to get out of range most likely as this is a SA-19 Grision (hence the BEEEEEEEP! sound), The Type 95 mobile AA launcher, the US avenger, or the M6 bradley linebacker. Panic. Just kdding, try to ignore that alarm first of all (turn off the volume if it makes concentration easier, we already know that a SAM is there). Now where is it coming from? Where isn't it coming from?
Just use some hints ie) are there friendly tanks in the area? Hopefully they aren't coexisting at your peril. Are there ENEMY tanks in the area being protected by the AA (As most AA vehicles are savvy enough to stay near a tank, other wise you shouldn't need to worry about it for very long...), how are friendly aircraft behaving? Are they dropping flares and turning sharply on your map? Just keep doing either low sweeping turns or be trying to lose altitude. Trees are the ideal cover, as they will allow the SAM to gain a lock, but not enought to shoot (you will know he's there, but you're perfectly safe). If you've got a gunner make sure he's giving you the heading and range to the threat, so you can evade, or engage if so equipped. As I metioned eariler always keep the threat perpendicular to your flight path, and his missiles will need to hook a 90 degree angle to hit you. Anyone familiar with the BF2 missile system will be either completely frustrated, or completely relieved with the results of this engagement. Guess which one makes you wait 10 minutes for a new ride?
5. Jets, and picking your hill to die on
When a jet has spotted you and you know it, make sure you've got some altitude. The perfect kill shot it a jet is just a little above and behind a chopper for pretty obvious reasons. But just relax, you still have some advantages.
He can only see you when you're in font on him. And hes going pretty fast, so he might need to take a few passes to orient himself. Once you hear him pass you, TURN IN THE DIRECTION THAT HE JUST WENT. He will do 1 of two things once he sees that your travelling HEAD ON. A) make a snapshot with his guns. Or B) turn behind you for another pass. So while his back is turned, just follow his last heading. NOTE: When I am in a jet I usually don't take any chances and fly straight up above my target, this allows me to have exactly or close to the ideal chopper kill, which works best against an "opponent" who DOESN'T CHANGE HIS ALTITUDE. Most chopper pilots like to fly at less than 200 feet from habitually evading SAMS and not air threats. Go higher if you have to, many pilots don't expect it. If anything, choppers are easy to see against the ground. At least in clouds you have a chance.
6. Tanks: so vulnerable, so lethal... The bored pilots worst enemy.
Tanks are your second worst nightmare (see above). They can zoom to just under 1000m, can kill you in a single blast, and are impervious to any thing other than the tow missile/hellfire (DICE was a little confused when they programmed them). But apart than that, they are slow, cumbersome, have a poor field of view, and have much bigger problems than a confused looking blackhawk trying to find his beleagured squadmates and get to his next LZ. Use all of the second points to diminish all of the first. Fly low or high, stay in trees, use your map, don't hover too long, and try to focus on the task at hand (You are NOT flying a joint strike fighter so stop pretending you are!)
This guide took me about 45 minutes, rather short for me but I've had plenty of time to think about it. You may notice how I did not mention RPG's or HAT's. Keep in mind that this guide is (for the most part) for AA survival and evasion, not for prevention and penetration. RPGs attacks are inevitavble and cannot be directly combated from a helicopter. The risk can be minimized and generally avoided by communication and a rigid flight plan with clear "no-fly zones", and again looking at your map, and knowing the positions of armored vehicles (or where they seem to keep dying). I plan to write a guide on how to minmize RPG attacks (they in fact may need their own guide as they are such a problem